PyTorch-YOLOv3のdetect.pyを改造してみた[TensorBoard/tensorboardX]
はじめに
前回の記事でPyTorch-YOLOv3を動かすことができたので、入力した画像の中にある物体を判別するdetect.pyを改造してみます。
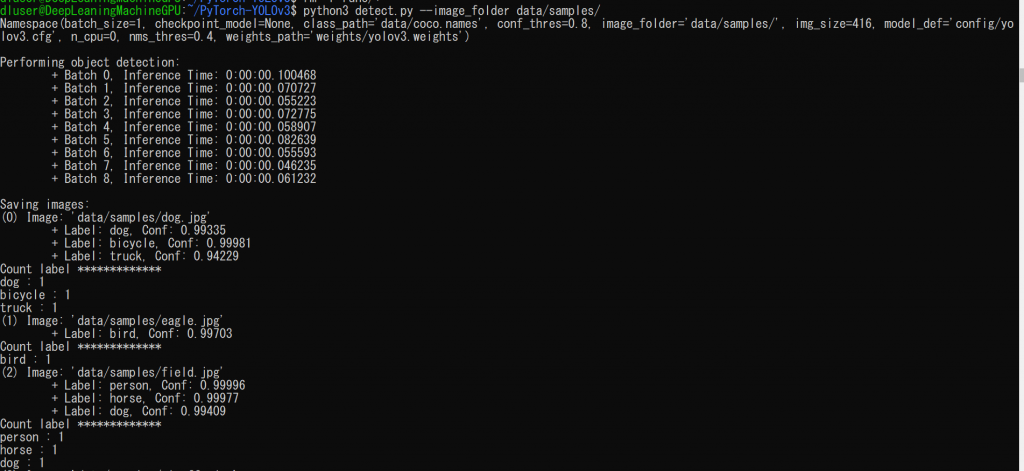
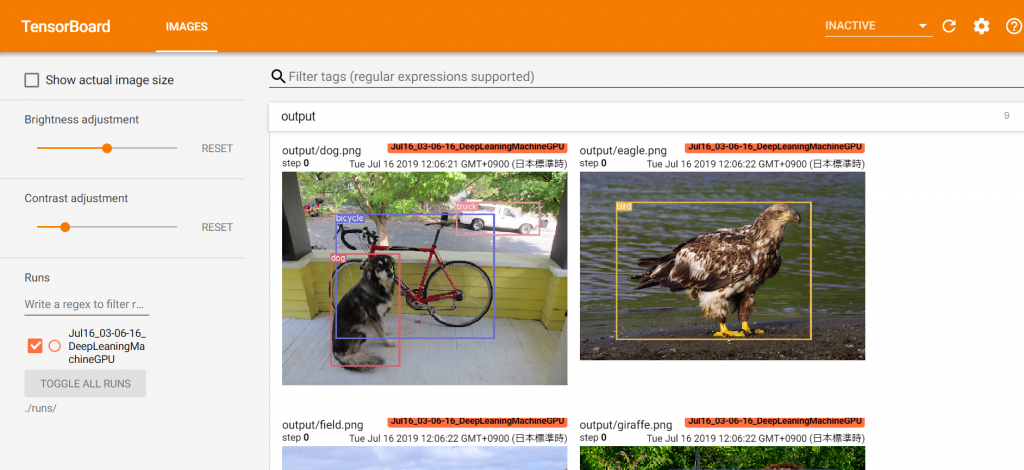
すでに実行結果の画像は保存されるようになっていたので、ラベルの数をカウントしたものをコマンドプロンプトで表示し、またTensorBoardで実行結果の画像表示することによってローカルから簡単に結果を見ることができるようにしました。
コード
実際に改造した結果のコードを紹介します。
from __future__ import division

from models import *
from utils.utils import *
from utils.datasets import *

import os
import sys
import time
import datetime
import argparse

from PIL import Image

import torch
from torch.utils.data import DataLoader
from torchvision import datasets
from torch.autograd import Variable

import matplotlib.pyplot as plt
import matplotlib.patches as patches
from matplotlib.ticker import NullLocator

import cv2
import numpy
import tensorboardX
from collections import Counter

if __name__ == "__main__":
    parser = argparse.ArgumentParser()
    parser.add_argument("--image_folder", type=str, default="data/samples", help="path to dataset")
    parser.add_argument("--model_def", type=str, default="config/yolov3.cfg", help="path to model definition file")
    parser.add_argument("--weights_path", type=str, default="weights/yolov3.weights", help="path to weights file")
    parser.add_argument("--class_path", type=str, default="data/coco.names", help="path to class label file")
    parser.add_argument("--conf_thres", type=float, default=0.8, help="object confidence threshold")
    parser.add_argument("--nms_thres", type=float, default=0.4, help="iou thresshold for non-maximum suppression")
    parser.add_argument("--batch_size", type=int, default=1, help="size of the batches")
    parser.add_argument("--n_cpu", type=int, default=0, help="number of cpu threads to use during batch generation")
    parser.add_argument("--img_size", type=int, default=416, help="size of each image dimension")
    parser.add_argument("--checkpoint_model", type=str, help="path to checkpoint model")
    opt = parser.parse_args()
    print(opt)

    writer = tensorboardX.SummaryWriter()

    device = torch.device("cuda" if torch.cuda.is_available() else "cpu")

    os.makedirs("output", exist_ok=True)

    # Set up model
    model = Darknet(opt.model_def, img_size=opt.img_size).to(device)

    if opt.weights_path.endswith(".weights"):
        # Load darknet weights
        model.load_darknet_weights(opt.weights_path)
    else:
        # Load checkpoint weights
        model.load_state_dict(torch.load(opt.weights_path))

    model.eval()  # Set in evaluation mode

    dataloader = DataLoader(
        ImageFolder(opt.image_folder, img_size=opt.img_size),
        batch_size=opt.batch_size,
        shuffle=False,
        num_workers=opt.n_cpu,
    )

    classes = load_classes(opt.class_path)  # Extracts class labels from file

    Tensor = torch.cuda.FloatTensor if torch.cuda.is_available() else torch.FloatTensor

    imgs = []  # Stores image paths
    img_detections = []  # Stores detections for each image index

    print("\nPerforming object detection:")
    prev_time = time.time()
    for batch_i, (img_paths, input_imgs) in enumerate(dataloader):
        # Configure input
        input_imgs = Variable(input_imgs.type(Tensor))

        # Get detections
        with torch.no_grad():
            detections = model(input_imgs)
            detections = non_max_suppression(detections, opt.conf_thres, opt.nms_thres)

        # Log progress
        current_time = time.time()
        inference_time = datetime.timedelta(seconds=current_time - prev_time)
        prev_time = current_time
        print("\t+ Batch %d, Inference Time: %s" % (batch_i, inference_time))

        # Save image and detections
        imgs.extend(img_paths)
        img_detections.extend(detections)

    # Bounding-box colors
    cmap = plt.get_cmap("tab20b")
    colors = [cmap(i) for i in np.linspace(0, 1, 20)]

    print("\nSaving images:")
    # Iterate through images and save plot of detections
    for img_i, (path, detections) in enumerate(zip(imgs, img_detections)):

        print("(%d) Image: '%s'" % (img_i, path))

        # Create plot
        img = np.array(Image.open(path))
        plt.figure()
        fig, ax = plt.subplots(1)
        ax.imshow(img)

        # Draw bounding boxes and labels of detections
        if detections is not None:
            # Rescale boxes to original image
            detections = rescale_boxes(detections, opt.img_size, img.shape[:2])
            unique_labels = detections[:, -1].cpu().unique()
            n_cls_preds = len(unique_labels)
            bbox_colors = random.sample(colors, n_cls_preds)
            cls_count_list = []
            for x1, y1, x2, y2, conf, cls_conf, cls_pred in detections:
                cls_count_list.append(classes[int(cls_pred)])
                print("\t+ Label: %s, Conf: %.5f" % (classes[int(cls_pred)], cls_conf.item()))

                box_w = x2 - x1
                box_h = y2 - y1

                color = bbox_colors[int(np.where(unique_labels == int(cls_pred))[0])]
                # Create a Rectangle patch
                bbox = patches.Rectangle((x1, y1), box_w, box_h, linewidth=2, edgecolor=color, facecolor="none")
                # Add the bbox to the plot
                ax.add_patch(bbox)
                # Add label
                plt.text(
                    x1,
                    y1,
                    s=classes[int(cls_pred)],
                    color="white",
                    verticalalignment="top",
                    bbox={"color": color, "pad": 0},
                )
            cls_count = Counter(cls_count_list)
            print("Count label *************")
            for c, num in cls_count.most_common():
                print(c, ":", num)
        # Save generated image with detections
        plt.axis("off")
        plt.gca().xaxis.set_major_locator(NullLocator())
        plt.gca().yaxis.set_major_locator(NullLocator())
        filename = path.split("/")[-1].split(".")[0]
        plt.savefig(f"output/{filename}.png", bbox_inches="tight", pad_inches=0.0)
        img_array = cv2.imread(f"output/{filename}.png")
        img_array = cv2.cvtColor(img_array, cv2.COLOR_BGR2RGB)
        writer.add_image(f"output/{filename}.png", img_array, 0, dataformats='HWC')
        plt.close()
    writer.close()
実行結果
以下のコマンドで実行します。
python3 detect.py --image_folder data/samples/コマンドプロンプトには以下のようにラベルのカウント結果が表示されます。

TensorBoardの結果は./runsに保存されるので、この記事を参考にローカルのブラウザからTensorBoardにアクセスすると、以下のように表示されます。

おわりに
PyTorch-YOLOv3の入力した画像の中にある物体を判別するdetect.pyを改造してみました。
TensorBoard便利ですね。


![Microsoft Power BI [実践] 入門 ―― BI初心者でもすぐできる! リアルタイム分析・可視化の手引きとリファレンス](/assets/img/banner-power-bi.c9bd875.png)
![Microsoft Power Apps ローコード開発[実践]入門――ノンプログラマーにやさしいアプリ開発の手引きとリファレンス](/assets/img/banner-powerplatform-2.213ebee.png)
![Microsoft PowerPlatformローコード開発[活用]入門 ――現場で使える業務アプリのレシピ集](/assets/img/banner-powerplatform-1.a01c0c2.png)


