2026-03-05

目次

- はじめに
- まずは全体像をつかもう
- Step 1: ライブラリを入れる
- Step 2: Firebase設定ファイルを配置する
- Step 3: app.json を設定する
- Step 4: Expo Go で動かない問題に対処する
- Step 5: FCMトークンを取得するHookを作る
- Step 6: Context でトークンをアプリ全体に共有する
- Step 7: 通知を受け取る処理を書く
- Step 8: Android固有の設定を入れる
- build.gradle の変更
- 通知アイコンの設定
- 完成したファイル構成
- iOS と Android で違うところ
- 実装中にハマったところ
- 1. Expo Go でクラッシュする
- 2. iOS で useFrameworks を忘れてビルドが通らない
- 3. フォアグラウンド通知が表示されない
- まとめ
はじめに
「モバイルアプリにプッシュ通知を入れたいけど、なんか難しそう…」と思っていませんか? 自分も最初はそう思ってました。iOSとAndroidで設定が違うし、Expoとの相性も気になるし、そもそもFirebaseの設定がめんどくさそう、と。
もちろんプロダクション品質にするにはもうちょっと手を入れる必要がありますが、「まず動くものを作る」というところまでなら意外とシンプルです。
この記事では、Expo(React Native)プロジェクトに Firebase Cloud Messaging(FCM)でプッシュ通知を組み込んだ手順を、「簡単にやってみる」目線で紹介します。
- Expo(SDK 50+)を使ったReact Nativeプロジェクトがすでにある
- Firebaseプロジェクトは作成済み(まだの人はFirebase Consoleから作れます)
まずは全体像をつかもう
いきなりコードを書く前に、プッシュ通知がどう流れるのかをざっくり見ておきましょう。 全体像がわかっていると、「今どの部分を実装しているのか」がわかりやすくなります。
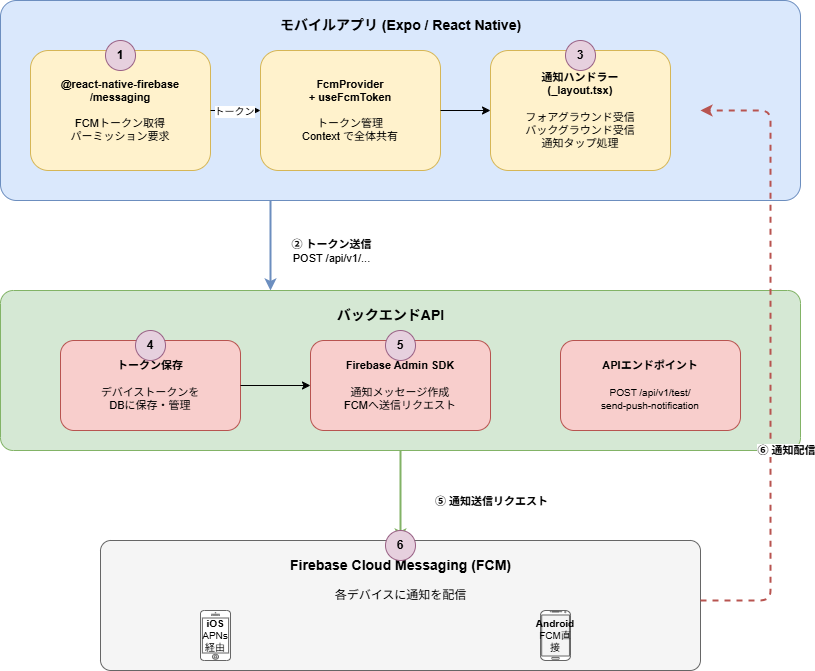
この記事ではモバイルアプリ側(1〜3)にフォーカスします。 バックエンド側は「FCMトークンを受け取って Firebase Admin SDK で送る」というシンプルな構成なので、詳細は割愛します。
Step 1: ライブラリを入れる
必要なのはこの2つだけです。
npx expo install @react-native-firebase/app @react-native-firebase/messaging@react-native-firebase/app がFirebaseの基盤で、@react-native-firebase/messaging がFCM本体です。 npx expo install を使えば、Expoのバージョンに合ったものを自動で入れてくれるので楽ちんです。
Step 2: Firebase設定ファイルを配置する
Firebase Consoleでアプリを登録すると、プラットフォームごとの設定ファイルがダウンロードできます。 これをプロジェクトの所定の場所に置きましょう。
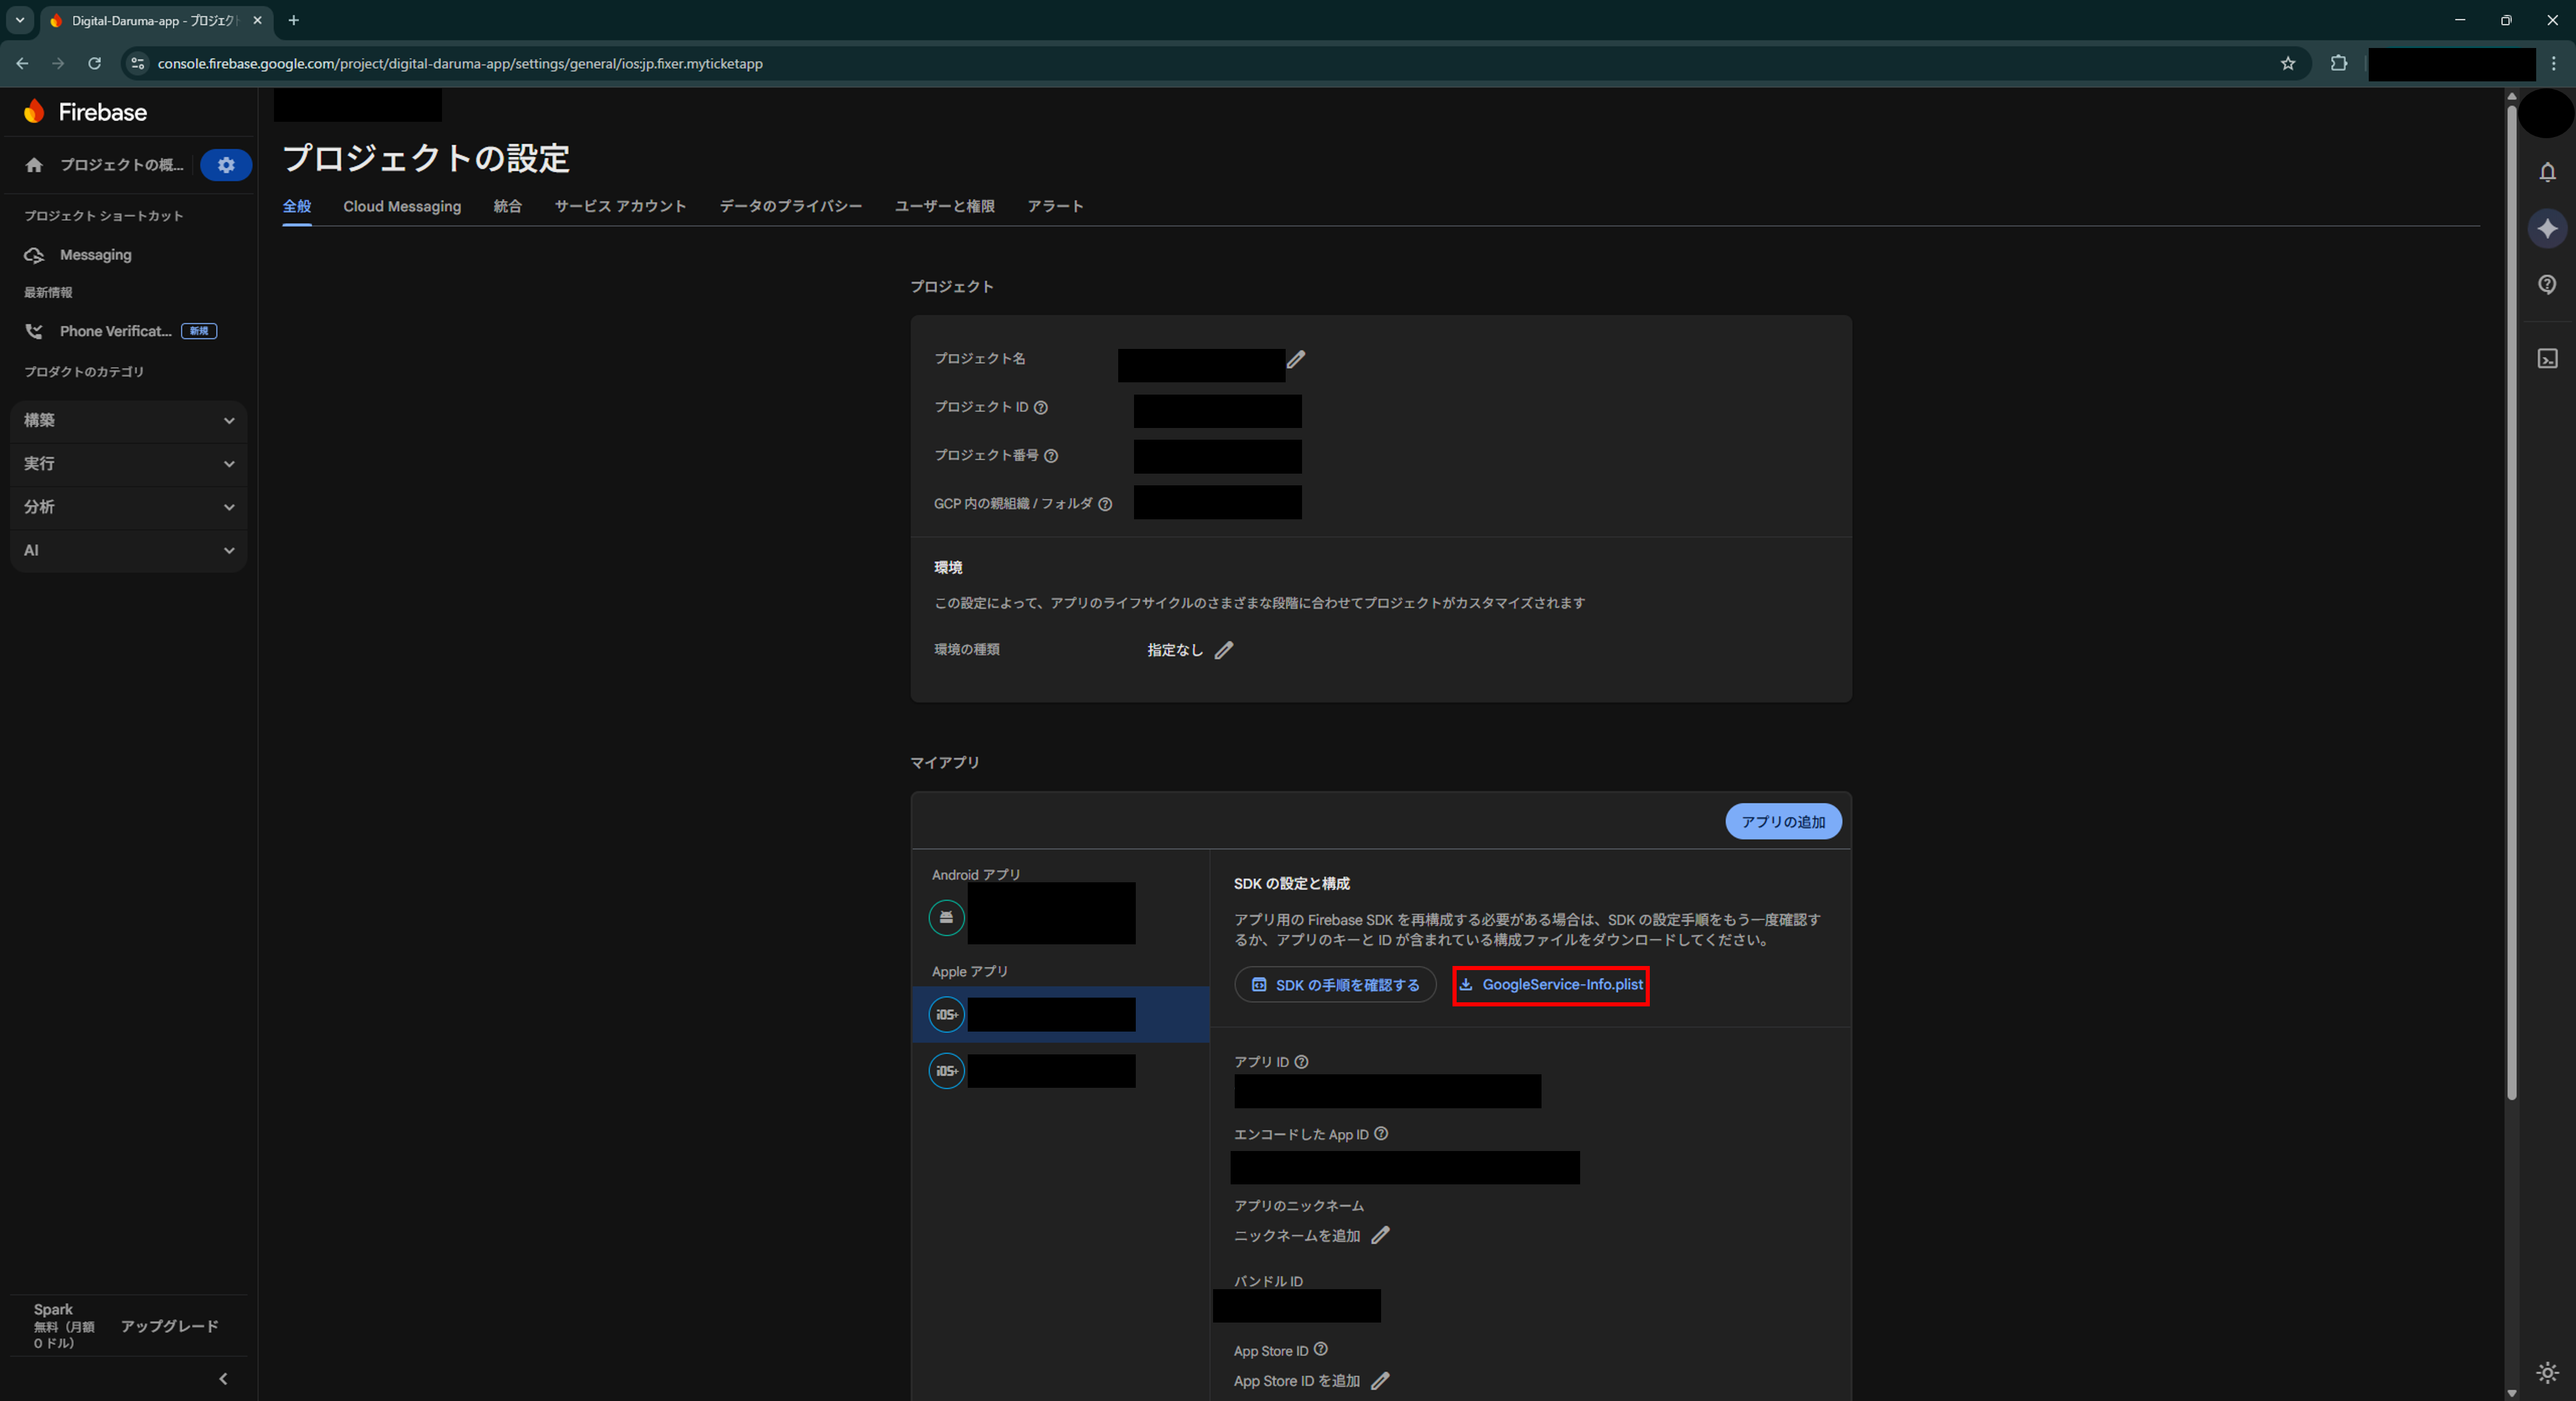
iOS
GoogleService-Info.plist- 配置先:
ios/直下
Android
google-services.json- 配置先:
android/app/直下
Step 3: app.json を設定する
ここがExpoならではのポイント。app.json(または app.config.js)にFirebase関連の設定を追加します。
{
  "expo": {
    "ios": {
      "infoPlist": {
        "UIBackgroundModes": ["remote-notification"]
      },
      "googleServicesFile": "./ios/GoogleService-Info.plist",
      "useFrameworks": "static"
    },
    "android": {
      "permissions": ["android.permission.POST_NOTIFICATIONS"],
      "googleServicesFile": "./android/app/google-services.json"
    },
    "plugins": [
      [
        "@react-native-firebase/app",
        {
          "ios": { "useFrameworks": "static" }
        }
      ],
      "@react-native-firebase/messaging"
    ]
  }
}iOSでは "useFrameworks": "static" を忘れると、ビルド時にFirebase関連のPodリンクが失敗します。 自分もこれで最初ハマりました。Firebaseのドキュメントにもしれっと書いてありますが、見落としがちなので注意です。
Step 4: Expo Go で動かない問題に対処する
ここ、地味に大事です。Firebase Messaging はネイティブモジュールなので、Expo Go では動きません。 開発中にExpo Goで起動するとクラッシュしてしまうので、環境を判定して回避する仕組みが必要です。
// utils/platformDetection.ts
import Constants from 'expo-constants';

// Expo Go 環境かどうかを判定
export const isExpoGo = (): boolean =>
  Constants.appOwnership === 'expo';

// Firebase Messaging が使える環境かどうか
export const isFirebaseMessagingAvailable = (): boolean =>
  !isExpoGo();
たった数行ですが、この判定がないと開発時にかなり困ります。 Expo Go で普段の開発をしつつ、通知のテストだけ開発ビルドで確認する、というフローが実現できます。
Step 5: FCMトークンを取得するHookを作る
ここからが本丸。FCMトークンを取得するカスタムHookを作ります。 このトークンが「このデバイスに通知を送ってね」という宛先になります。
// hooks/notification/useFcmToken.ts
import { useEffect, useState, useRef, useCallback } from 'react';
import { isFirebaseMessagingAvailable } from '@/utils/platformDetection';

// Expo Go ではインポートしない(条件付きrequire)
let messaging: any = null;

if (isFirebaseMessagingAvailable()) {
  try {
    messaging = require('@react-native-firebase/messaging').default;
  } catch (error) {
    console.warn('Firebase Messaging is not available:', error);
  }
}

export const useFcmToken = () => {
  const [token, setToken] = useState<string | null>(null);
  const [isLoading, setIsLoading] = useState(true);
  const isInitialized = useRef(false);

  // パーミッション要求 → トークン取得
  const requestPermission = useCallback(async () => {
    if (!messaging) return false;

    const authStatus = await messaging().requestPermission();
    const enabled =
      authStatus === messaging.AuthorizationStatus.AUTHORIZED ||
      authStatus === messaging.AuthorizationStatus.PROVISIONAL;

    if (enabled) {
      const fcmToken = await messaging().getToken();
      if (fcmToken) setToken(fcmToken);
    }

    return enabled;
  }, []);

  // 初期化(アプリ起動時に1回だけ実行)
  useEffect(() => {
    if (isInitialized.current || !messaging) {
      setIsLoading(false);
      return;
    }

    isInitialized.current = true;
    requestPermission().finally(() => setIsLoading(false));

    // トークン更新リスナー
    const unsubscribe = messaging().onTokenRefresh((newToken: string) => {
      setToken(newToken);
    });

    return unsubscribe;
  }, [requestPermission]);

  return { token, isLoading, requestPermission };
};import 文だとバンドル時に必ず読み込まれてしまうので、require() でランタイムに条件付きで読み込んでいます。 これにより Expo Go 環境ではFirebaseモジュールを一切ロードしないようにしています。
React 18 の Strict Mode では useEffect が開発時に2回実行されます。 useRef で初期化フラグを持たせることで、トークン取得が2重に走るのを防いでいます。
Step 6: Context でトークンをアプリ全体に共有する
取得したFCMトークンは、テスト通知の送信やバックエンドへの登録など、いろんな場所から使いたくなります。 React Context で包むのが手っ取り早いです。
// contexts/FcmContext.tsx
const FcmContext = createContext<FcmTokenState | null>(null);

export const FcmProvider = ({ children }) => {
  const fcmToken = useFcmToken();
  return (
    <FcmContext.Provider value={fcmToken}>
      {children}
    </FcmContext.Provider>
  );
};

// どのコンポーネントからでもトークンにアクセスできる
export const useFcm = () => {
  const context = useContext(FcmContext);
  if (!context) {
    throw new Error('useFcm must be used within FcmProvider');
  }
  return context;
};あとはルートレイアウト(_layout.tsx)で <FcmProvider> を他のProviderより外側に配置するだけです。
// app/_layout.tsx

// ① フォアグラウンド:自分でアラートを出す
useEffect(() => {
  if (!messaging) return;

  const unsubscribe = messaging().onMessage(async (remoteMessage) => {
    const { notification } = remoteMessage;
    if (notification) {
      Alert.alert(
        notification.title || 'お知らせ',
        notification.body || ''
      );
    }
  });

  return unsubscribe;
}, []);

// ② バックグラウンドから通知タップで復帰
useEffect(() => {
  if (!messaging) return;

  const unsubscribe = messaging().onNotificationOpenedApp((remoteMessage) => {
    console.log('通知タップで起動:', remoteMessage);
    // → 特定の画面に遷移するなどの処理
  });

  return unsubscribe;
}, []);

// ③ 完全終了状態から通知タップで起動
useEffect(() => {
  if (!messaging) return;

  messaging().getInitialNotification().then((remoteMessage) => {
    if (remoteMessage) {
      console.log('kill状態から通知で起動:', remoteMessage);
    }
  });
}, []);
Step 7: 通知を受け取る処理を書く
プッシュ通知は、アプリの状態によって受信方法が違います。ここが一番ややこしいところですが、整理するとこの3パターンです。
| アプリの状態 | 使うAPI | 何が起きるか |
|---|---|---|
| フォアグラウンド(開いてる) | onMessage | 自前で表示する必要あり |
| バックグラウンド(閉じてる) | onNotificationOpenedApp | 通知タップで起動した時に処理 |
| 完全終了(killされてる) | getInitialNotification | 通知タップで起動した時に処理 |
それぞれの実装を見てみましょう。
// app/_layout.tsx

// ① フォアグラウンド:自分でアラートを出す
useEffect(() => {
  if (!messaging) return;

  const unsubscribe = messaging().onMessage(async (remoteMessage) => {
    const { notification } = remoteMessage;
    if (notification) {
      Alert.alert(
        notification.title || 'お知らせ',
        notification.body || ''
      );
    }
  });

  return unsubscribe;
}, []);

// ② バックグラウンドから通知タップで復帰
useEffect(() => {
  if (!messaging) return;

  const unsubscribe = messaging().onNotificationOpenedApp((remoteMessage) => {
    console.log('通知タップで起動:', remoteMessage);
    // → 特定の画面に遷移するなどの処理
  });

  return unsubscribe;
}, []);

// ③ 完全終了状態から通知タップで起動
useEffect(() => {
  if (!messaging) return;

  messaging().getInitialNotification().then((remoteMessage) => {
    if (remoteMessage) {
      console.log('kill状態から通知で起動:', remoteMessage);
    }
  });
}, []);setBackgroundMessageHandler はアプリ起動前に呼ばれる可能性があるので、Reactコンポーネントの外(ファイルのトップレベル)で登録します。
// app/_layout.tsx のトップレベル(コンポーネント定義の外)
if (messaging) {
  messaging().setBackgroundMessageHandler(async (remoteMessage) => {
    console.log('[FCM] Background message:', remoteMessage);
  });
}
Step 8: Android固有の設定を入れる
iOSはapp.jsonだけでほぼ完結しますが、Androidはもうちょっと設定が必要です。
build.gradle の変更
// android/build.gradle
dependencies {
  classpath('com.google.gms:google-services:4.4.0')
}

// android/app/build.gradle
apply plugin: 'com.google.gms.google-services'
通知アイコンの設定
Androidでは通知アイコンをカスタマイズできます。各解像度に合わせたアイコンを用意しましょう。
android/app/src/main/res/
├── drawable/
│   └── notification_icon.xml    ← ベクター版
├── drawable-mdpi/
│   └── notification_icon.png    ← 24x24
├── drawable-hdpi/
│   └── notification_icon.png    ← 36x36
├── drawable-xhdpi/
│   └── notification_icon.png    ← 48x48
├── drawable-xxhdpi/
│   └── notification_icon.png    ← 72x72
└── drawable-xxxhdpi/
└── notification_icon.png ← 96x96Androidの通知アイコンは白色のシルエットにする必要があります。 カラー画像をそのまま置くと、通知バーでグレーの四角になってしまうので注意してください。
完成したファイル構成
実装後のFCM関連ファイルはこうなりました。
src/
├── contexts/
│   └── FcmContext.tsx              # FCMトークンのグローバル管理
├── hooks/
│   └── notification/
│       ├── index.ts                # エクスポート集約
│       ├── useFcmToken.ts          # トークン取得・パーミッション管理
│       └── useSendTestNotification.ts  # テスト通知送信
├── services/
│   └── fcmService.ts               # API呼び出し
├── types/
│   └── fcm.ts                      # 型定義
├── utils/
│   └── platformDetection.ts        # Expo Go判定
└── app/
    └── _layout.tsx                 # Provider配置 & 受信ハンドラー
ファイル数としては7つくらい。Hook / Context / Service / Type と役割で分けているので、 それぞれのファイルは短くて見通しが良い状態を保てています。
iOS と Android で違うところ
iOS
GoogleService-Info.plistをios/に配置UIBackgroundModesにremote-notification追加useFrameworks: "static"が必須requestPermission()で動的にパーミッション要求- APNs証明書またはAPNsキーの設定が別途必要
Android
google-services.jsonをandroid/app/に配置POST_NOTIFICATIONSパーミッション宣言build.gradleにプラグイン追加- 通知アイコンの各解像度画像が必要
- Android 13以降はランタイムパーミッション必要
実装中にハマったところ
1. Expo Go でクラッシュする
最初、Expo Go で動かしたらアプリが即落ちしました。 Firebase Messaging がネイティブモジュールだということを知らなかった…というのが原因。 Step 4 で紹介した isFirebaseMessagingAvailable() を入れて、条件付き require() にすることで解決しました。
2. iOS で useFrameworks を忘れてビルドが通らない
app.json に "useFrameworks": "static" を入れ忘れると、pod install 時にFirebase関連のリンクがうまくいかずビルドエラーになります。 エラーメッセージがわかりにくいので、「Firebaseを入れたらとりあえず useFrameworks」と覚えておくと良いです。
3. フォアグラウンド通知が表示されない
バックグラウンドではOSが勝手に通知を表示してくれますが、フォアグラウンドでは自分でハンドリングしないと何も起きません。 onMessage で受け取って Alert.alert() で表示する処理を入れる必要がありました。 もっとリッチにやりたければ、notifee というライブラリを使うのもアリです。
まとめ
環境設定がちょっとめんどくさいのは事実ですが、コード自体はシンプルで、Custom Hook + Context というReactの基本パターンに収まります。
振り返ると、ステップは大きく分けてこれだけでした。
| ステップ | やること |
|---|---|
| 1-3 | ライブラリ導入 & 設定ファイル配置 |
| 4 | Expo Go対応の判定ロジック |
| 5-6 | FCMトークン取得 Hook & Context |
| 7 | 通知受信ハンドラー(3パターン) |
| 8 | Android固有設定 |
「プッシュ通知は大変そう」と後回しにしている方がいたら、まずは動くものを作ってみるところから始めてみてはいかがでしょうか。
この記事ではシンプルに通知を受け取るところまでを紹介しましたが、プロダクションで使うならこのあたりも対応が必要です。
- FCMトークンのバックエンドへの自動送信・更新管理
- トピックベースの通知(特定グループへの配信)
- 通知タップ時のディープリンク(特定画面への遷移)
notifeeを使ったリッチ通知の表示


![Microsoft Power BI [実践] 入門 ―― BI初心者でもすぐできる! リアルタイム分析・可視化の手引きとリファレンス](/assets/img/banner-power-bi.c9bd875.png)
![Microsoft Power Apps ローコード開発[実践]入門――ノンプログラマーにやさしいアプリ開発の手引きとリファレンス](/assets/img/banner-powerplatform-2.213ebee.png)
![Microsoft PowerPlatformローコード開発[活用]入門 ――現場で使える業務アプリのレシピ集](/assets/img/banner-powerplatform-1.a01c0c2.png)