2021-02-26

はじめに
2020年入社の黛です。巷ではノンコーディングが流行ってますが、カスタマイズに弱いなって思うことが多々あるので、今回はゴリゴリコード書いてbot作っていきます。
bot Frameworkの概念的な話
よく使うダイアログの種類
ダイアログにはいくつかの種類があります(公式ドキュメント)。 この中でも主に使うものを軽く触れておきます。
Waterfall Dialog
Waterfall Dialogは一通している会話を作りたい時に使用します。1回の会話のやりとりをstepといい、これを設定した順で実行していきます。
Adaptive Dialog
Adaptive DialogとはWaterfallよりも柔軟な会話を実現したい時に使用します。例えば、中断処理や会話の分岐などを簡単に実現することができます。また、LUISやQnAMakerといったサービスと簡単に連携してイベントを発火させることもできます。
Component Dialog
一連のダイアログをまとめて再利用できるようにしたダイアログです。基本的にこのComponent Dialogを継承したクラスにWaterfallやAdaptiveを実装すると楽です。
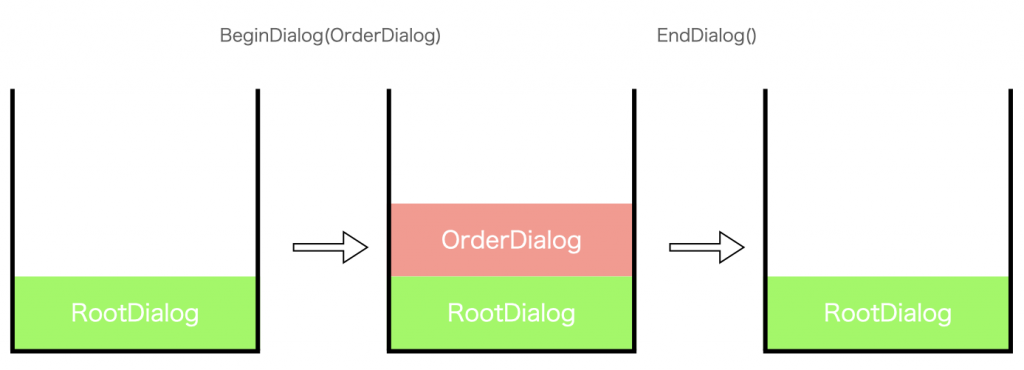
ダイアログスタック
ダイアログにはスタックという仕組みがあります。スタックのトップにあるものが現在アクティブなダイアログです。
プログラムを実行するとまずRootDialogがスタックにpushされます。その後、BeginDialog()によって他のダイアログを開始すると新しくpushされます。EndDialog()を実行することによりそのダイアログはpopされアクティブなダイアログは元のRootDialogとなります。
簡単なEcho Botを作るまで
今回はWaterfall Dialogを使ったEcho Botを作ってみます。
プロジェクトの作り方
- .NET Core SDK Version3.1以降がなければダウンロードしてくる。
- Bot FrameworkのC#でのEchoBotテンプレートを持ってくる。ターミナル等で以下を実行。
dotnet new -i Microsoft.Bot.Framework.CSharp.EchoBotプロジェクトを作りたいディレクトリで
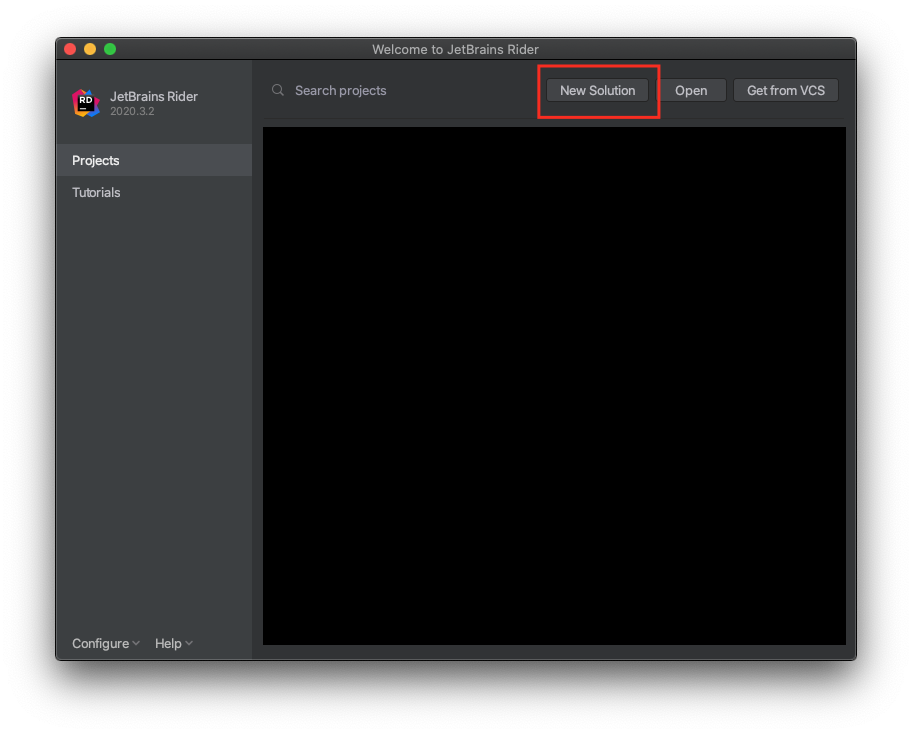
dotnet newコマンドを実行!…してもいいのですが、これでやるとソリューションファイルが作られないのでRiderやVisualStudioを使って作っていきます。Riderを使った手順を書きますがVisualStusioでもできると思います。多分…Riderを起動して
New Solutionを選択します。
- 左側のブレードにEcho Botのテンプレートができてるはずなので選択します。展開したいディレクトリやプロジェクト名などを設定して
Createします。
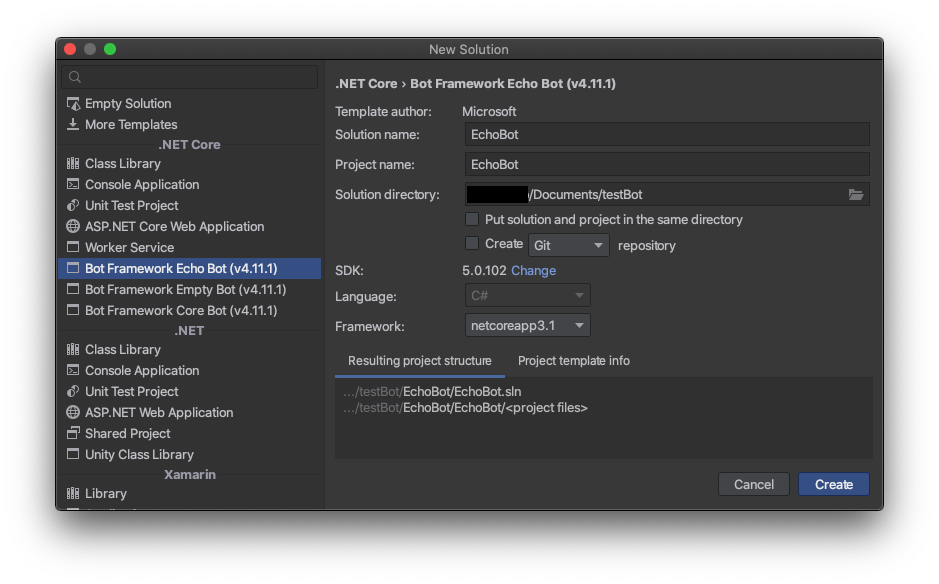
これでプロジェクトの作成は完了です。
実装編
このままでもEcho botとして動作するのですが、拡張することを考えてWaterfall Dialogを使った書き方に変えていきます。
まずはじめに以下をNuGetで入れてください
Microsoft.Bot.Builder.Dialogs次にBots/EchoBot.csを以下の内容で書き換えます。
using System.Collections.Generic;
using System.Threading;
using System.Threading.Tasks;
using Microsoft.Bot.Builder;
using Microsoft.Bot.Builder.Dialogs;
using Microsoft.Bot.Schema;

namespace EchoBot.Bots
{
  public class EchoBot<T> : ActivityHandler
  {
      protected readonly BotState ConversationState;
      protected readonly Microsoft.Bot.Builder.Dialogs.Dialog Dialog;

      public EchoBot(ConversationState conversationState,Microsoft.Bot.Builder.Dialogs.Dialog dialog)
      {
          ConversationState = conversationState;
          Dialog = dialog;
      }

      public override async Task OnTurnAsync(ITurnContext turnContext, CancellationToken cancellationToken = default)
      {
          await base.OnTurnAsync(turnContext, cancellationToken);
          await ConversationState.SaveChangesAsync(turnContext, false, cancellationToken);
      }

      protected override async Task OnMessageActivityAsync(ITurnContext<IMessageActivity> turnContext, CancellationToken cancellationToken) =>
          // Run the Dialog with the new message Activity.
          await Dialog.RunAsync(turnContext, ConversationState.CreateProperty<DialogState>(nameof(DialogState)), cancellationToken);

      protected override async Task OnMembersAddedAsync(IList<ChannelAccount> membersAdded,
          ITurnContext<IConversationUpdateActivity> turnContext, CancellationToken cancellationToken)
      {
          var welcomeText = "Hello and welcome!";
          foreach (var member in membersAdded)
          {
              if (member.Id != turnContext.Activity.Recipient.Id)
              {
                  await turnContext.SendActivityAsync(MessageFactory.Text(welcomeText, welcomeText),
                      cancellationToken);
              }
          }
      }
  }
}
次にDialogを作っていきます。 Dialogディレクトリを作ってその中にRootDialog.csを作成して以下のコードを書いていきます。コンストラクタ内のWaterfallStepにステップを追加することで、その順に実行されていきます。
using System.Threading;
using System.Threading.Tasks;
using Microsoft.Bot.Builder;
using Microsoft.Bot.Builder.Dialogs;

namespace EchoBot.Dialog
{
    public class RootDialog : ComponentDialog
    {
        public RootDialog() : base(nameof(RootDialog))
        {
            var steps = new WaterfallStep[]
            {
                FirstStep
            };
            AddDialog(new WaterfallDialog("waterfallDialog",steps));
            InitialDialogId = "waterfallDialog";
        }
        private async Task<DialogTurnResult> FirstStep(WaterfallStepContext stepContext,
            CancellationToken cancellationToken)
        {
            await stepContext.Context.SendActivityAsync(MessageFactory.Text("Echo : " + stepContext.Context.Activity.Text),
                cancellationToken);
            return await stepContext.EndDialogAsync(cancellationToken: cancellationToken);
        }
    }
}最後にStartup.csを変更して完了です。
using EchoBot.Dialog;
using EchoBot.Bots;
using Microsoft.AspNetCore.Builder;
using Microsoft.AspNetCore.Hosting;
using Microsoft.Bot.Builder;
using Microsoft.Bot.Builder.Integration.AspNet.Core;
using Microsoft.Extensions.Configuration;
using Microsoft.Extensions.DependencyInjection;
using Microsoft.Extensions.Hosting;

namespace EchoBot
{
    public class Startup
    {
        public Startup(IConfiguration configuration)
        {
            Configuration = configuration;
        }

        public IConfiguration Configuration { get; }

        // This method gets called by the runtime. Use this method to add services to the container.
        public void ConfigureServices(IServiceCollection services)
        {
            services.AddControllers().AddNewtonsoftJson();

            // Create the Bot Framework Adapter with error handling enabled.
            services.AddSingleton<IBotFrameworkHttpAdapter, AdapterWithErrorHandler>();

            // The Dialog that will be run by the bot.
            services.AddSingleton<RootDialog>();

            // Create the bot as a transient. In this case the ASP Controller is expecting an IBot.
            // services.AddScoped<IBot, Bots.EchoBot<RootDialog>>();
            services.AddScoped<IBot, EchoBot<RootDialog>>();

            // Create the storage we'll be using for User and Conversation state. (Memory is great for testing purposes.)
            services.AddSingleton<IStorage, MemoryStorage>();

            // Create the Conversation state. (Used by the Dialog system itself.)
            services.AddSingleton<ConversationState>();
        }

        // This method gets called by the runtime. Use this method to configure the HTTP request pipeline.
        public void Configure(IApplicationBuilder app, IWebHostEnvironment env)
        {
            if (env.IsDevelopment())
            {
                app.UseDeveloperExceptionPage();
            }

            app.UseDefaultFiles()
                .UseStaticFiles()
                .UseWebSockets()
                .UseRouting()
                .UseAuthorization()
                .UseEndpoints(endpoints => { endpoints.MapControllers(); });

            // app.UseHttpsRedirection();
        }
    }
}
実行
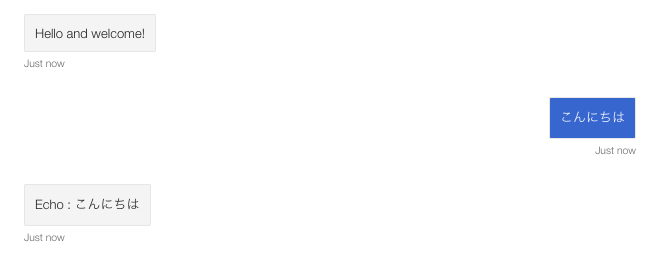
実行したものを確認するために、まずBot Framework Emulatorをダウンロードします。ダウンロードしたらngrokをインストールしたり、エミュレータで以下のような設定が必要だったりします。
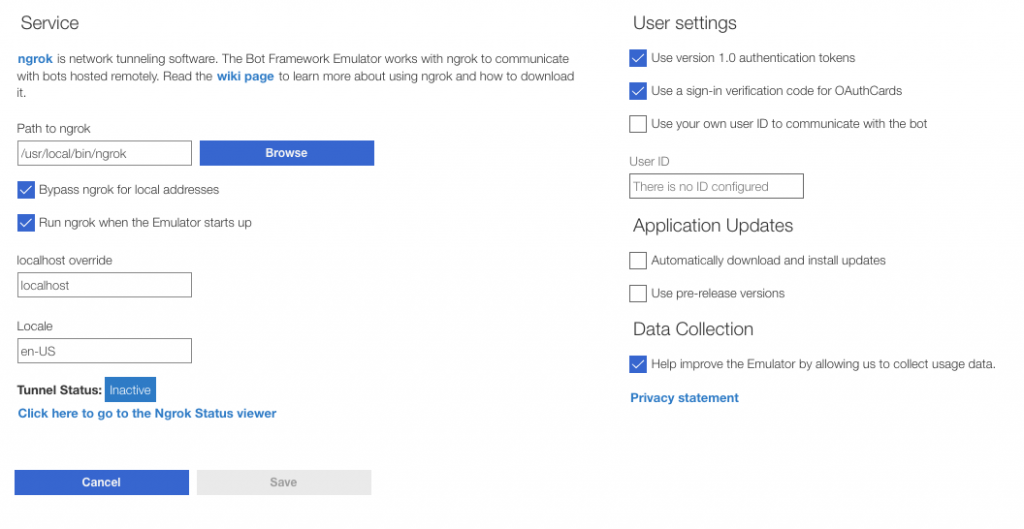
open botボタンをクリックし、Bot URLにhttp://localhost:3978/api/messagesを入れConnectをクリックします。
何か文字を入れることで同じ文章が返ってくるEchoボットの動作が確認できるかと思います。
応用編
DialogからDialogを呼び出したい
botの規模が大きくなってくるとRootDialogから別のDialogを呼び出したくなります。 そこで、上のEchoBotを少し改造してそれをできるようにしてみます。
まず、Dialogディレクトリ内に新しくNextDialog.csを作り、以下の内容を書きます。
using System.Threading;
using System.Threading.Tasks;
using Microsoft.Bot.Builder;
using Microsoft.Bot.Builder.Dialogs;

namespace EchoBot.Dialog
{
    public class NextDialog : ComponentDialog
    {
        public NextDialog() : base(nameof(NextDialog))
        {
            var steps = new WaterfallStep[]
            {
                NextStep
            };
            AddDialog(new WaterfallDialog("nextDialog",steps));
            InitialDialogId = "nextDialog";
        }

        private async Task<DialogTurnResult> NextStep(WaterfallStepContext stepContext,
            CancellationToken cancellationToken)
        {
            await stepContext.Context.SendActivityAsync(MessageFactory.Text("NextStepの中"), cancellationToken);
            return await stepContext.EndDialogAsync(cancellationToken: cancellationToken);
        }
    }
}
次にRootDialogを以下のように書き換えます。変更点としては、
- コンストラクタの引数にNextDialogを追加
- 追加したものをAddDialogする
- FirstStepからNextDialogに遷移できるようにBeginDialogAsyncを呼ぶ
の3つです。
using System.Threading;
using System.Threading.Tasks;
using Microsoft.Bot.Builder;
using Microsoft.Bot.Builder.Dialogs;

namespace EchoBot.Dialog
{
    public class RootDialog : ComponentDialog
    {
        public RootDialog(NextDialog nextDialog) : base(nameof(RootDialog))
        {
            var steps = new WaterfallStep[]
            {
                FirstStep
            };
            AddDialog(new WaterfallDialog("waterfallDialog",steps));
            AddDialog(nextDialog);
            InitialDialogId = "waterfallDialog";
        }
        private async Task<DialogTurnResult> FirstStep(WaterfallStepContext stepContext,
            CancellationToken cancellationToken)
        {
            await stepContext.Context.SendActivityAsync(MessageFactory.Text("Echo : " + stepContext.Context.Activity.Text),
                cancellationToken);
            return await stepContext.BeginDialogAsync(nameof(NextDialog), cancellationToken: cancellationToken);
        }
    }
}
最後にStartup.csに以下を追記します。
services.AddSingleton<NextDialog>();実行すると、NextStepに遷移できてることが確認できました。

ここで、RootDialog.csに以下を追記して実行してください。
            var steps = new WaterfallStep[]
            {
                FirstStep,
                SecondStep
            };
~~~~~~~~~~~~~~~~~略~~~~~~~~~~~~~~~~~~~~~
        private async Task<DialogTurnResult> SecondStep(WaterfallStepContext stepContext,
            CancellationToken cancellationToken)
        {
            await stepContext.Context.SendActivityAsync(MessageFactory.Text("RootDialogのSecondStepの中"),
                cancellationToken);
            return await stepContext.EndDialogAsync(cancellationToken: cancellationToken);
        }
するとこのような結果になります。
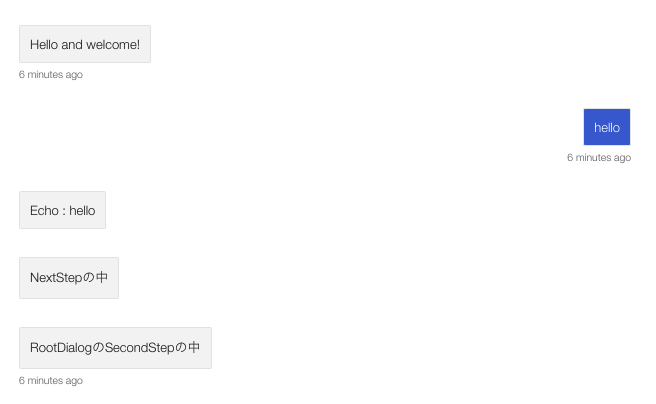
Waterfall Dialogではステップの途中でBeginDialogAsyncすると呼んだダイアログがダイアログスタックにプッシュされます。そして、そのダイアログが終了することによってポップされ、元のダイアログに戻ってきます。
BeginDialogAsyncをReplaceDialogAsyncに変更すると、現在のダイアログをダイアログスタックからポップし、次呼び出すダイアログをプッシュします。なので、実行結果はNextStepの中で会話が終了します。
おわり
今回はゼロからbotを作る工程と、個人的にどハマりした別ダイアログを呼ぶ工程について書きました。次はAdaptiveDialogあたりを書くかも?


![Microsoft Power BI [実践] 入門 ―― BI初心者でもすぐできる! リアルタイム分析・可視化の手引きとリファレンス](/assets/img/banner-power-bi.c9bd875.png)
![Microsoft Power Apps ローコード開発[実践]入門――ノンプログラマーにやさしいアプリ開発の手引きとリファレンス](/assets/img/banner-powerplatform-2.213ebee.png)
![Microsoft PowerPlatformローコード開発[活用]入門 ――現場で使える業務アプリのレシピ集](/assets/img/banner-powerplatform-1.a01c0c2.png)