2021-12-17

初めに
この記事はFIXER Rookies Advent Calendar 2021 17日目の記事です。
こんにちは、入社1年目の日高です。AzureのサービスであるAzure Communication Servicesとvue.jsを使用した通話アプリの作成方法について書いていきたいと思います。
Azure Communication Servicesについて
Azure Communication Services(以下ACSと書きます)は、公式の言葉を借りつつ説明すると、「Teamsと同じプラットフォーム機能を使用した、様々なコミュニケーションツールを作成できるサービス」です。
機能一覧としては以下のようになっています。ただ日本では使用できないものも存在します
- チャット
- 電話番号に対して電話をかける(日本では未対応)
- SMSメッセージを送信する(日本では未対応)
- 音声及びビデオによる通話
今回はACSの音声及びビデオによる通話機能を使用して通話アプリを作成していきたいと思います。
ACSリソースを作成する
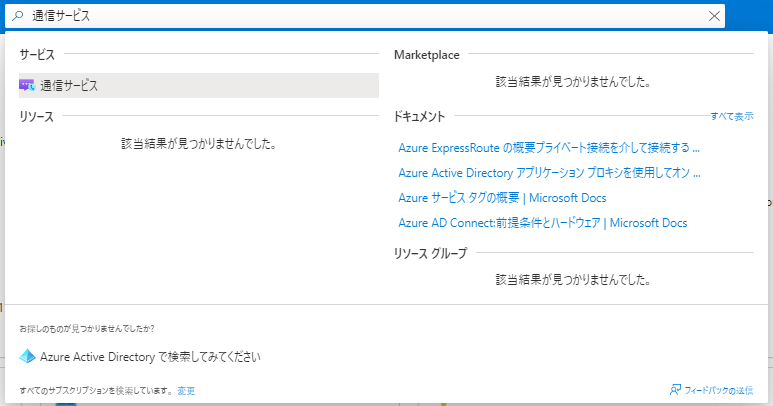
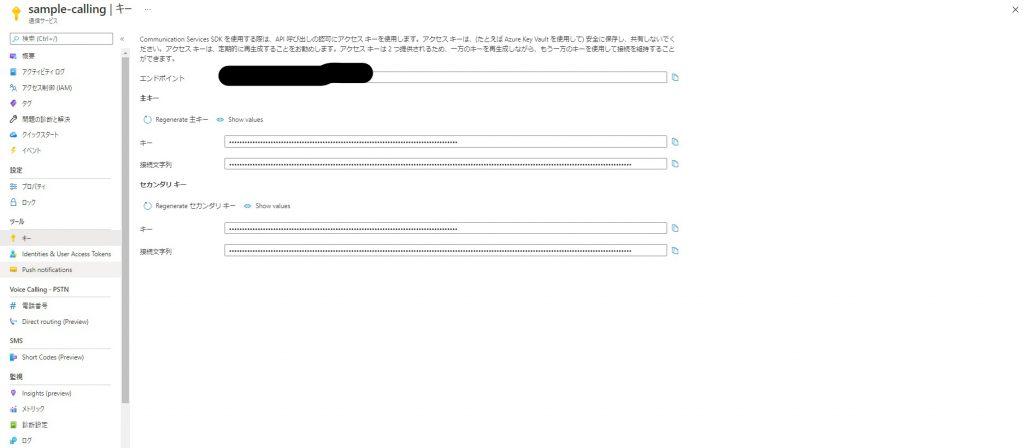
アプリを作成する前にACSのリソースを作成する必要があります。Azure Portalの検索窓で「通信サービス」と検索してリソースを作成してください。
作成が終わったらリソースを選択して、接続文字列をコピーしておいてください。
アプリを作成する
ACSのリソース作成と接続文字列のコピーが終わったら実際にアプリを作成していきます。今回はvueとvuetifyを使用しますが、こちらの使い方については触れません。
実際のコードは以下のようになっています。
↓ App.vue
<template>
  <v-app>
    <v-main>
      <v-row no-gutters>
        <v-col v-for="remoteParticipant in remoteParticipants" :key="remoteParticipant.identifier.communicationUserId" cols="4">
          <RemoteVideo :remoteParticipant="remoteParticipant" />
        </v-col>
      </v-row>
    </v-main>
  </v-app>
</template>
<script>
import { AzureCommunicationTokenCredential } from "@azure/communication-common";
import { CommunicationIdentityClient } from "@azure/communication-identity";
import { CallClient, LocalVideoStream } from "@azure/communication-calling";
import RemoteVideo from "./components/RemoteVideo.vue";

export default {
  components:{
    RemoteVideo
  },
  data: function(){
    return {
      tokenCredential: null,
      callAgent: null,
      deviceManager: null,
      call: null,
      remoteParticipants: []
    }
  },
  created: async function(){
    // トークン生成
    await this.generateTokenCredential();

    // 通話を行うための事前準備
    const callClient = new CallClient();
    this.callAgent = await callClient.createCallAgent(this.tokenCredential, { displayName: 'optional ACS user name' });
    const deviceManager = await callClient.getDeviceManager();
    await deviceManager.askDevicePermission({
      audio: true,
      video: true
    });
    const videoDeviceList = await deviceManager.getCameras();
    const localVideoStream = new LocalVideoStream(videoDeviceList[0]);

    // 通話のオプションを作成
    let callOption = {}
    callOption.videoOptions = { localVideoStreams: [localVideoStream] };
    callOption.audioOptions = { muted: false}

    // 通話に参加
    this.call = this.callAgent.join({ groupId: "aaaaaaaa-aaaa-aaaa-aaaa-aaaaaaaaaaaa" }, callOption);

    // 参加者を更新
    const self = this;
    this.call.on("remoteParticipantsUpdated", function (e) {
      e.added.forEach((addedRemoteParticipant) => {
        const remoteParticipants = self.remoteParticipants;
        self.remoteParticipants = [
          ...remoteParticipants,
          addedRemoteParticipant
        ];

      });

      if (e.removed.length > 0) {
        self.remoteParticipants = self.call.remoteParticipants
      }
    });
  },
  methods: {
    generateTokenCredential: async function(){
      const connectionString = process.env["VUE_APP_ACS_ENDPOINT"];
      const identityClient = new CommunicationIdentityClient(connectionString);
      const identityResponse = await identityClient.createUser();
      const tokenResponse = await identityClient.getToken(identityResponse, [
        "voip"
      ]);
      const { token } = tokenResponse;
      this.tokenCredential = new AzureCommunicationTokenCredential(token);
    }
  }
};
</script>
↓ /component/RemoteVideo.vue
<template>
<div>
</div>
</template>
<script>
import {VideoStreamRenderer} from "@azure/communication-calling";
export default {
  props:{
    remoteParticipant:{
      required: true,
      type: Object
    }
  },
  data:function(){
    return {
      remoteVideoStreamRenderer: null
    }
  },
  created:async function(){
    this.remoteVideoStreamRenderer = new VideoStreamRenderer(this.remoteParticipant.videoStreams[0]);
    const view = await this.remoteVideoStreamRenderer.createView({scalingMode: "Crop"});
    this.$el.appendChild(view.target)
  },
  beforeDestroy: function(){
    this.remoteVideoStreamRenderer.dispose();
  }
}
</script>
ポイント解説していきます。
ユーザ発行とトークン生成
ACSの通話を行うにはユーザ発行とトークン生成を行う必要があります。
先程コピーしておいた接続文字列はここで使用します
    generateTokenCredential: async function(){
      const connectionString = process.env["VUE_APP_ACS_ENDPOINT"];
      const identityClient = new CommunicationIdentityClient(connectionString);
      const identityResponse = await identityClient.createUser();
      const tokenResponse = await identityClient.getToken(identityResponse, [
        "voip"
      ]);
      const { token } = tokenResponse;
      this.tokenCredential = new AzureCommunicationTokenCredential(token);
    }
通話に参加する
参加にはグループIDとcallOptionが必要です。グループIDはGUIDなら何でも構いません。
この時にcallインスタンスが生成されます
    // 通話のオプションを作成
    let callOption = {}
    callOption.videoOptions = { localVideoStreams: [localVideoStream] };
    callOption.audioOptions = { muted: false}

    // 通話に参加
    this.call = await this.callAgent.join({ groupId: "aaaaaaaa-aaaa-aaaa-aaaa-aaaaaaaaaaaa" }, callOption);
参加者リストを更新する
通話の参加者は、先程通話へ参加時に生成されるcallインスタンスのイベントリスナーを利用することで更新することができます
    // 参加者を更新
    const self = this;
    this.call.on("remoteParticipantsUpdated", function (e) {
      e.added.forEach((addedRemoteParticipant) => {
        const remoteParticipants = self.remoteParticipants;
        self.remoteParticipants = [
          ...remoteParticipants,
          addedRemoteParticipant
        ];

      });

      if (e.removed.length > 0) {
        self.remoteParticipants = self.call.remoteParticipants
      }
    });
参加者の映像を表示する
参加者のビデオはVideoStreamRendererを使用することで表示できます
VideoStreamRenderer.createViewを行うことでvideoタグを取得できるのでappendChildで要素として追加してあげれば表示されます
this.remoteVideoStreamRenderer = new VideoStreamRenderer(this.remoteParticipant.videoStreams[0]);
const view = await this.remoteVideoStreamRenderer.createView({scalingMode: "Crop"});
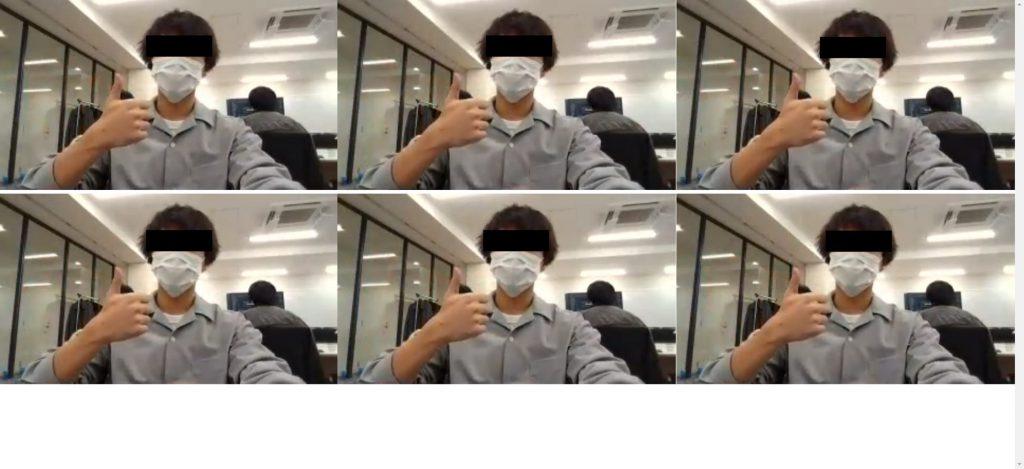
this.$el.appendChild(view.target)実際に動かす
さて、アプリが完成したので動かしてみます。vueアプリを立ち上げてアクセスしてみます
今回は7タブ開いて分身してみました
終わりに
いかがだったでしょうか?
今回は、通話に参加して参加者の映像を表示するという最低限の通話アプリを作成してみました。ほかにも、使用デバイスの制御や画面共有も行うこともできます。また内部的にTeams通話に参加することもできてしまいます。(Teams通話に参加する機能は最近GAされたのでまた別の記事で詳しく書こうと思います)
興味のある方はぜひ試してみてください!最後まで読んでいただきありがとうございました!


![Microsoft Power BI [実践] 入門 ―― BI初心者でもすぐできる! リアルタイム分析・可視化の手引きとリファレンス](/assets/img/banner-power-bi.c9bd875.png)
![Microsoft Power Apps ローコード開発[実践]入門――ノンプログラマーにやさしいアプリ開発の手引きとリファレンス](/assets/img/banner-powerplatform-2.213ebee.png)
![Microsoft PowerPlatformローコード開発[活用]入門 ――現場で使える業務アプリのレシピ集](/assets/img/banner-powerplatform-1.a01c0c2.png)