

こんにちは!!2022年入社の川田 隼己です。
今回のブログでは自分が高専3年生の時に独学でAndoroidアプリ開発やiOSアプリ開発などスマートフォン向けのアプリ開発にチャレンジしていました。その際に一番初めに取り組んだのが計算機でしたので、アプリ作ってみたいっていう方のスタートダッシュになれればうれしいです!
今回はAndroid studioという開発環境を使って作成していきます!言語は当時JavaしかわからなかったのでJavaで開発してます。target sdkは28で作成し,使用するエミュレータはNexus 6 を使って実行します!
デザイン作成(xmlレイアウト)
activity_main.xml
<?xml version="1.0" encoding="utf-8"?>
<androidx.constraintlayout.widget.ConstraintLayout xmlns:android="http://schemas.android.com/apk/res/android"
xmlns:app="http://schemas.android.com/apk/res-auto"
xmlns:tools="http://schemas.android.com/tools"
android:layout_width="match_parent"
android:layout_height="match_parent"
tools:context=".MainActivity">
<TableLayout
android:layout_width="match_parent"
android:layout_height="match_parent"
tools:layout_editor_absoluteX="-16dp">
<TableRow
android:layout_width="match_parent"
android:layout_height="match_parent">
<EditText
android:id="@+id/edit"
android:layout_width="match_parent"
android:layout_height="match_parent"
android:layout_weight="1"
android:background="@drawable/entry_button"
android:gravity="left"
android:maxLength="8"
android:text=""
android:textSize="40sp" />
<TextView
android:id="@+id/formula"
android:layout_width="wrap_content"
android:layout_height="130dp"
android:layout_weight="1"
android:text=""
android:textSize="40sp" />
</TableRow>
<TableRow
android:layout_width="match_parent"
android:layout_height="match_parent"
android:layout_marginTop="8dp"
android:layout_marginBottom="8dp">
<Button
android:id="@+id/seven"
android:layout_width="wrap_content"
android:layout_height="85dp"
android:layout_weight="1"
android:background="@drawable/entry_button"
android:text="7"
android:textSize="24sp" />
<Button
android:id="@+id/eight"
android:layout_width="wrap_content"
android:layout_height="85dp"
android:layout_weight="1"
android:background="@drawable/entry_button"
android:text="8"
android:textSize="24sp" />
<Button
android:id="@+id/nine"
android:layout_width="wrap_content"
android:layout_height="85dp"
android:layout_weight="1"
android:background="@drawable/entry_button"
android:text="9"
android:textSize="24sp"/>
<Button
android:id="@+id/divide"
android:layout_width="wrap_content"
android:layout_height="85dp"
android:layout_weight="1"
android:background="@drawable/entry_button"
android:text="/"
android:textSize="24sp" />
</TableRow>
<TableRow
android:layout_width="match_parent"
android:layout_height="match_parent"
android:layout_marginTop="8dp"
android:layout_marginBottom="8dp">
<Button
android:id="@+id/four"
android:layout_width="wrap_content"
android:layout_height="85dp"
android:layout_weight="1"
android:background="@drawable/entry_button"
android:text="4"
android:textSize="24sp" />
<Button
android:id="@+id/five"
android:layout_width="wrap_content"
android:layout_height="85dp"
android:layout_weight="1"
android:background="@drawable/entry_button"
android:text="5"
android:textSize="24sp" />
<Button
android:id="@+id/six"
android:layout_width="wrap_content"
android:layout_height="85dp"
android:layout_weight="1"
android:background="@drawable/entry_button"
android:text="6"
android:textSize="24sp" />
<Button
android:id="@+id/multiply"
android:layout_width="wrap_content"
android:layout_height="85dp"
android:layout_weight="1"
android:background="@drawable/entry_button"
android:text="*"
android:textSize="24sp" />
</TableRow>
<TableRow
android:layout_width="match_parent"
android:layout_height="match_parent"
android:layout_marginTop="8dp"
android:layout_marginBottom="8dp">
<Button
android:id="@+id/one"
android:layout_width="wrap_content"
android:layout_height="85dp"
android:layout_weight="1"
android:background="@drawable/entry_button"
android:text="1"
android:textSize="24sp" />
<Button
android:id="@+id/two"
android:layout_width="wrap_content"
android:layout_height="85dp"
android:layout_weight="1"
android:background="@drawable/entry_button"
android:text="2"
android:textSize="24sp" />
<Button
android:id="@+id/three"
android:layout_width="wrap_content"
android:layout_height="85dp"
android:layout_weight="1"
android:background="@drawable/entry_button"
android:text="3"
android:textSize="24sp" />
<Button
android:id="@+id/minus"
android:layout_width="wrap_content"
android:layout_height="85dp"
android:layout_weight="1"
android:background="@drawable/entry_button"
android:text="-"
android:textSize="24sp" />
</TableRow>
<TableRow
android:layout_width="match_parent"
android:layout_height="match_parent"
android:layout_marginTop="8dp"
android:layout_marginBottom="8dp">
<Button
android:id="@+id/zero"
android:layout_width="wrap_content"
android:layout_height="85dp"
android:layout_weight="1"
android:background="@drawable/entry_button"
android:text="0"
android:textSize="24sp" />
<Button
android:id="@+id/clear_text"
android:layout_width="wrap_content"
android:layout_height="85dp"
android:layout_weight="1"
android:background="@drawable/entry_button"
android:text="clear"
android:textSize="24sp" />
<Button
android:id="@+id/equals"
android:layout_width="wrap_content"
android:layout_height="85dp"
android:layout_weight="1"
android:background="@drawable/entry_button"
android:text="="
android:textSize="24sp" />
<Button
android:id="@+id/plus"
android:layout_width="wrap_content"
android:layout_height="85dp"
android:layout_weight="1"
android:background="@drawable/entry_button"
android:text="+"
android:textSize="24sp" />
</TableRow>
</TableLayout>
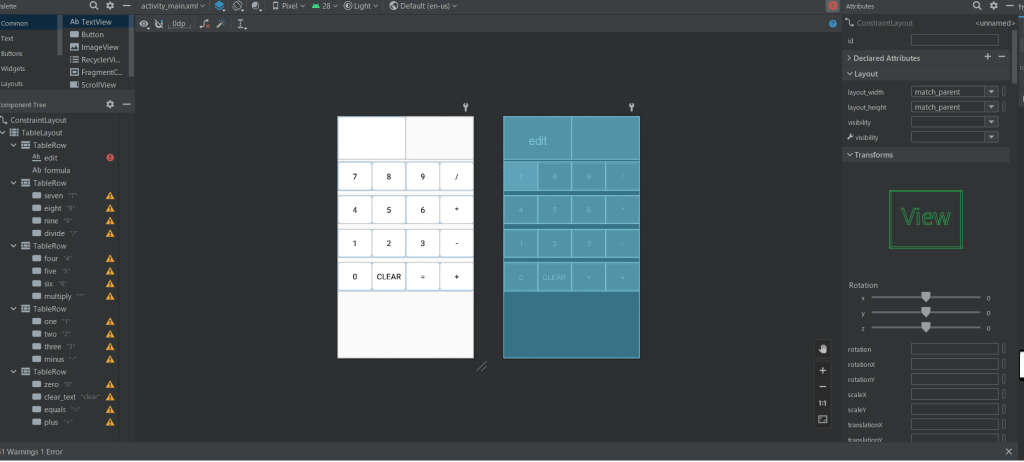
</androidx.constraintlayout.widget.ConstraintLayout>とこちらのコードを張るだけでUIが完成します!!!しかしこのままではエラーが起きてしまうので下のコードをdrowableフォルダに作成してください!!!
entry_button.xml
<?xml version="1.0" encoding="utf-8"?>
<shape xmlns:android="http://schemas.android.com/apk/res/android" android:shape="rectangle">
    <solid android:color="#FFF"/>
    <corners android:radius="8dp"/>
    <stroke android:color="#4cb4fa" android:width="1dp"/>
</shape>
するとこのように電卓のボタンなどが配置されています!!もうすでにそれっぽくなってきましたね!!
このまま使っていただいてもいいですし、かっこよく、もっと使いやすい形や好みにアレンジしてくださいませ!!
ロジック(java)
さてメインのロジックの部分です!!
MainActivity.java
package com.example.my_calc;
import android.app.Activity;
import android.os.Bundle;
import android.text.InputType;
import android.view.View;
import android.widget.Button;
import android.widget.EditText;
import android.widget.TextView;
public class MainActivity extends Activity {
TextView textView;
EditText editText;
boolean isOperatorKeyPushed;
int recentOperator = R.id.equals;
@Override
protected void onCreate(Bundle savedInstanceState) {
super.onCreate(savedInstanceState);
setContentView(R.layout.activity_main);
textView = findViewById(R.id.formula);
editText = findViewById(R.id.edit);
editText.setInputType(InputType.TYPE_NUMBER_VARIATION_NORMAL);
editText.setText("0");
//ボタンの宣言
findViewById(R.id.one).setOnClickListener(buttonNumberListener);
findViewById(R.id.two).setOnClickListener(buttonNumberListener);
findViewById(R.id.three).setOnClickListener(buttonNumberListener);
findViewById(R.id.four).setOnClickListener(buttonNumberListener);
findViewById(R.id.five).setOnClickListener(buttonNumberListener);
findViewById(R.id.six).setOnClickListener(buttonNumberListener);
findViewById(R.id.seven).setOnClickListener(buttonNumberListener);
findViewById(R.id.eight).setOnClickListener(buttonNumberListener);
findViewById(R.id.nine).setOnClickListener(buttonNumberListener);
findViewById(R.id.zero).setOnClickListener(buttonNumberListener);
findViewById(R.id.plus).setOnClickListener(buttonOperatorListener);
findViewById(R.id.minus).setOnClickListener(buttonOperatorListener);
findViewById(R.id.multiply).setOnClickListener(buttonOperatorListener);
findViewById(R.id.divide).setOnClickListener(buttonOperatorListener);
findViewById(R.id.equals).setOnClickListener(buttonOperatorListener);
findViewById(R.id.clear_text).setOnClickListener(buttonListener);
}
View.OnClickListener buttonNumberListener = new View.OnClickListener() {
@Override
public void onClick(View view) {
Button button = (Button) view;
String check1 = editText.getText().toString();
//+などの記号が押されていたらまたは数字が先頭が0なら0と押したボタンの数字を置き換え
if (isOperatorKeyPushed == true || check1.equals("0")) {
editText.setText(button.getText());
}
//上記以外なら文字を追加
else {
editText.append(button.getText());
}
//上記以外なら文字を追加
else {
editText.append(button.getText());
}
isOperatorKeyPushed = false;
}
};
View.OnClickListener buttonOperatorListener = new View.OnClickListener() {
double result = 0;
@Override
public void onClick(View view) {
Button operatorButton = (Button) view;
double value = Double.parseDouble(editText.getText().toString());
if (recentOperator == R.id.equals) {
result = value;
} else {
result = calc(recentOperator, result, value);//計算するメソッド呼び出し
}
editText.setText(String.valueOf(result));
recentOperator = operatorButton.getId();
textView.setText(operatorButton.getText());
isOperatorKeyPushed = true;
}
};
View.OnClickListener buttonListener = new View.OnClickListener() {
@Override
public void onClick(View view) {
double val = Double.parseDouble(editText.getText().toString());
Button operatorButton = (Button) view;
int thisId = operatorButton.getId();
if (thisId == R.id.clear_text) {
isOperatorKeyPushed = false;
recentOperator = R.id.equals;
textView.setText(" ");
editText.setText("0");
}
}
};
//計算するメソッド
double calc(int operator, double value1, double value2) {
switch (operator) {
case R.id.plus:
return value1 + value2;
case R.id.minus:
return value1 - value2;
case R.id.multiply:
return value1 * value2;
case R.id.divide:
return value1 / value2;
default:
return value1;
}
}
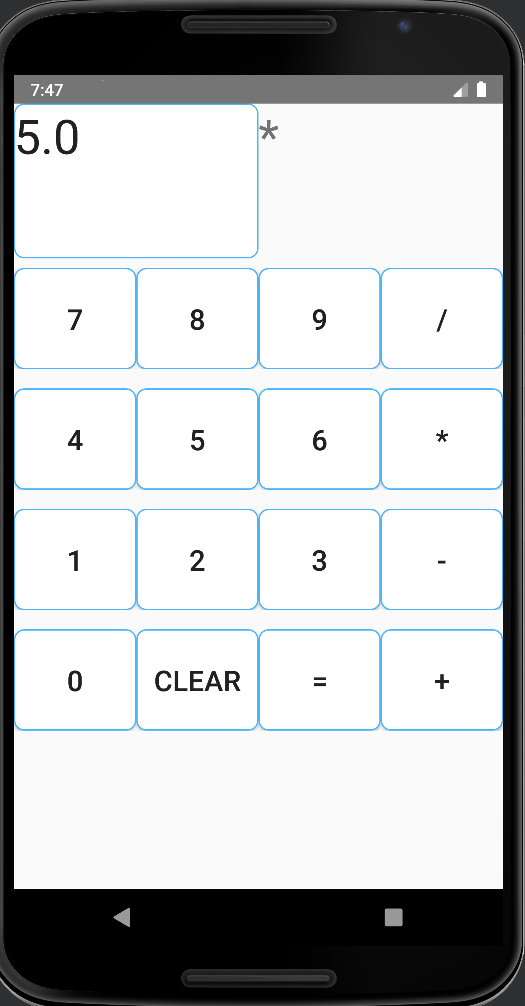
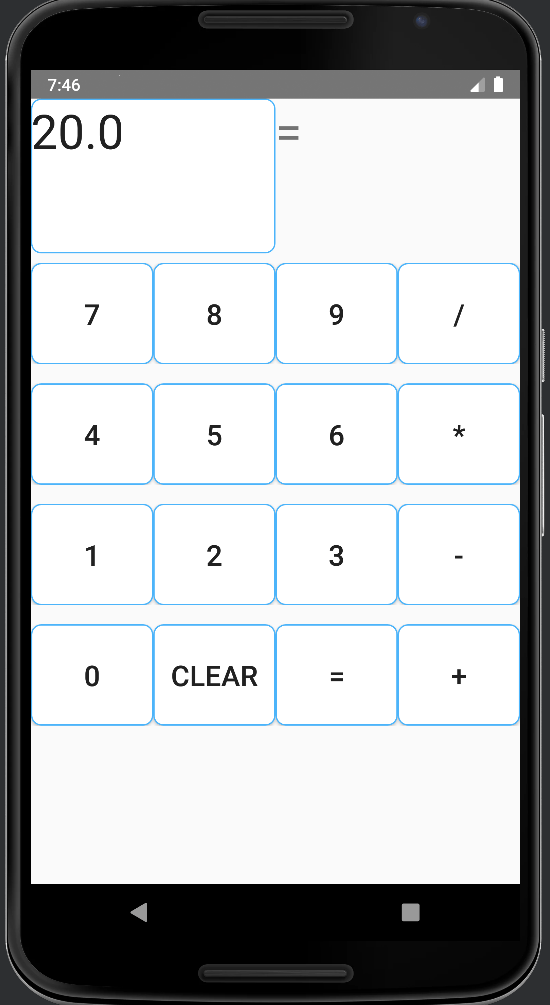
}これで実行してみます!!!エミュレーターがうまく起動すれば成功です!!
試しに5*4をしてみました!!うまく掛け算できているようです!!
当時僕がつまずいた処理部分を簡単に解説していきます!あまりきれいなコードではないのと勉強したての頃に思いついたロジックなのでそこは温かい目で見てください(´・ω・`)
View.OnClickListener buttonNumberListener = new View.OnClickListener() {

        @Override
        public void onClick(View view) {

            Button button = (Button) view;
            String check1 = editText.getText().toString();

            //+などの記号が押されていたらまたは数字が先頭が0なら0と押したボタンの数字を置き換え
            if (isOperatorKeyPushed == true || check1.equals("0")) {
                editText.setText(button.getText());
            }
            //上記以外なら文字を追加
            else {
                editText.append(button.getText());
            }
            //上記以外なら文字を追加
            else {
                editText.append(button.getText());
            }
            isOperatorKeyPushed = false;
        }
    };
ここでは数字のボタンが押された時の処理が書いてあります。if文では計算記号やイコール、0が押されていたらすでに表示されている数字を新しいものに置き換えるために記述しています。これを書かないと一度計算して
=20が表示されたまま計算しようとすると=20の後に3が追加されてしまいます。
電卓は起動したら最初は0が表示されているのでこれも置き換えてあげないと03などになってしまうためです。
このロジックを考えているときに意外と電卓って考えないといけないんだなと思ったのが懐かしいです(笑)。
まとめ
いかがでしたか!!!こちらのコードをアレンジしてUIをかっこよくしたり新たな機能を追加してみたりして遊んでいただけたらとてもうれしいです!!!小数点以下の計算だったり関数電卓にしてみたりしても面白いかもしれませんね(笑)。
※小数点の計算のもなかなかめんどくさいです。連続で0..と打てないようにや0.0.にできないようになど気を遣う部分がたくさんありますのでチャレンジしてみてください........(笑)
今回作成したものはもちろん自分の携帯など(Android端末)にインストールすることもできるので、機能性抜群のアプリを作って友達などに自慢してみるのも面白いですね(笑)。
この記事が自分で何か作る楽しさのきっかけになれば幸いです。


![Microsoft Power BI [実践] 入門 ―― BI初心者でもすぐできる! リアルタイム分析・可視化の手引きとリファレンス](/assets/img/banner-power-bi.c9bd875.png)
![Microsoft Power Apps ローコード開発[実践]入門――ノンプログラマーにやさしいアプリ開発の手引きとリファレンス](/assets/img/banner-powerplatform-2.213ebee.png)
![Microsoft PowerPlatformローコード開発[活用]入門 ――現場で使える業務アプリのレシピ集](/assets/img/banner-powerplatform-1.a01c0c2.png)