2022-12-25


こんにちは。山本です。

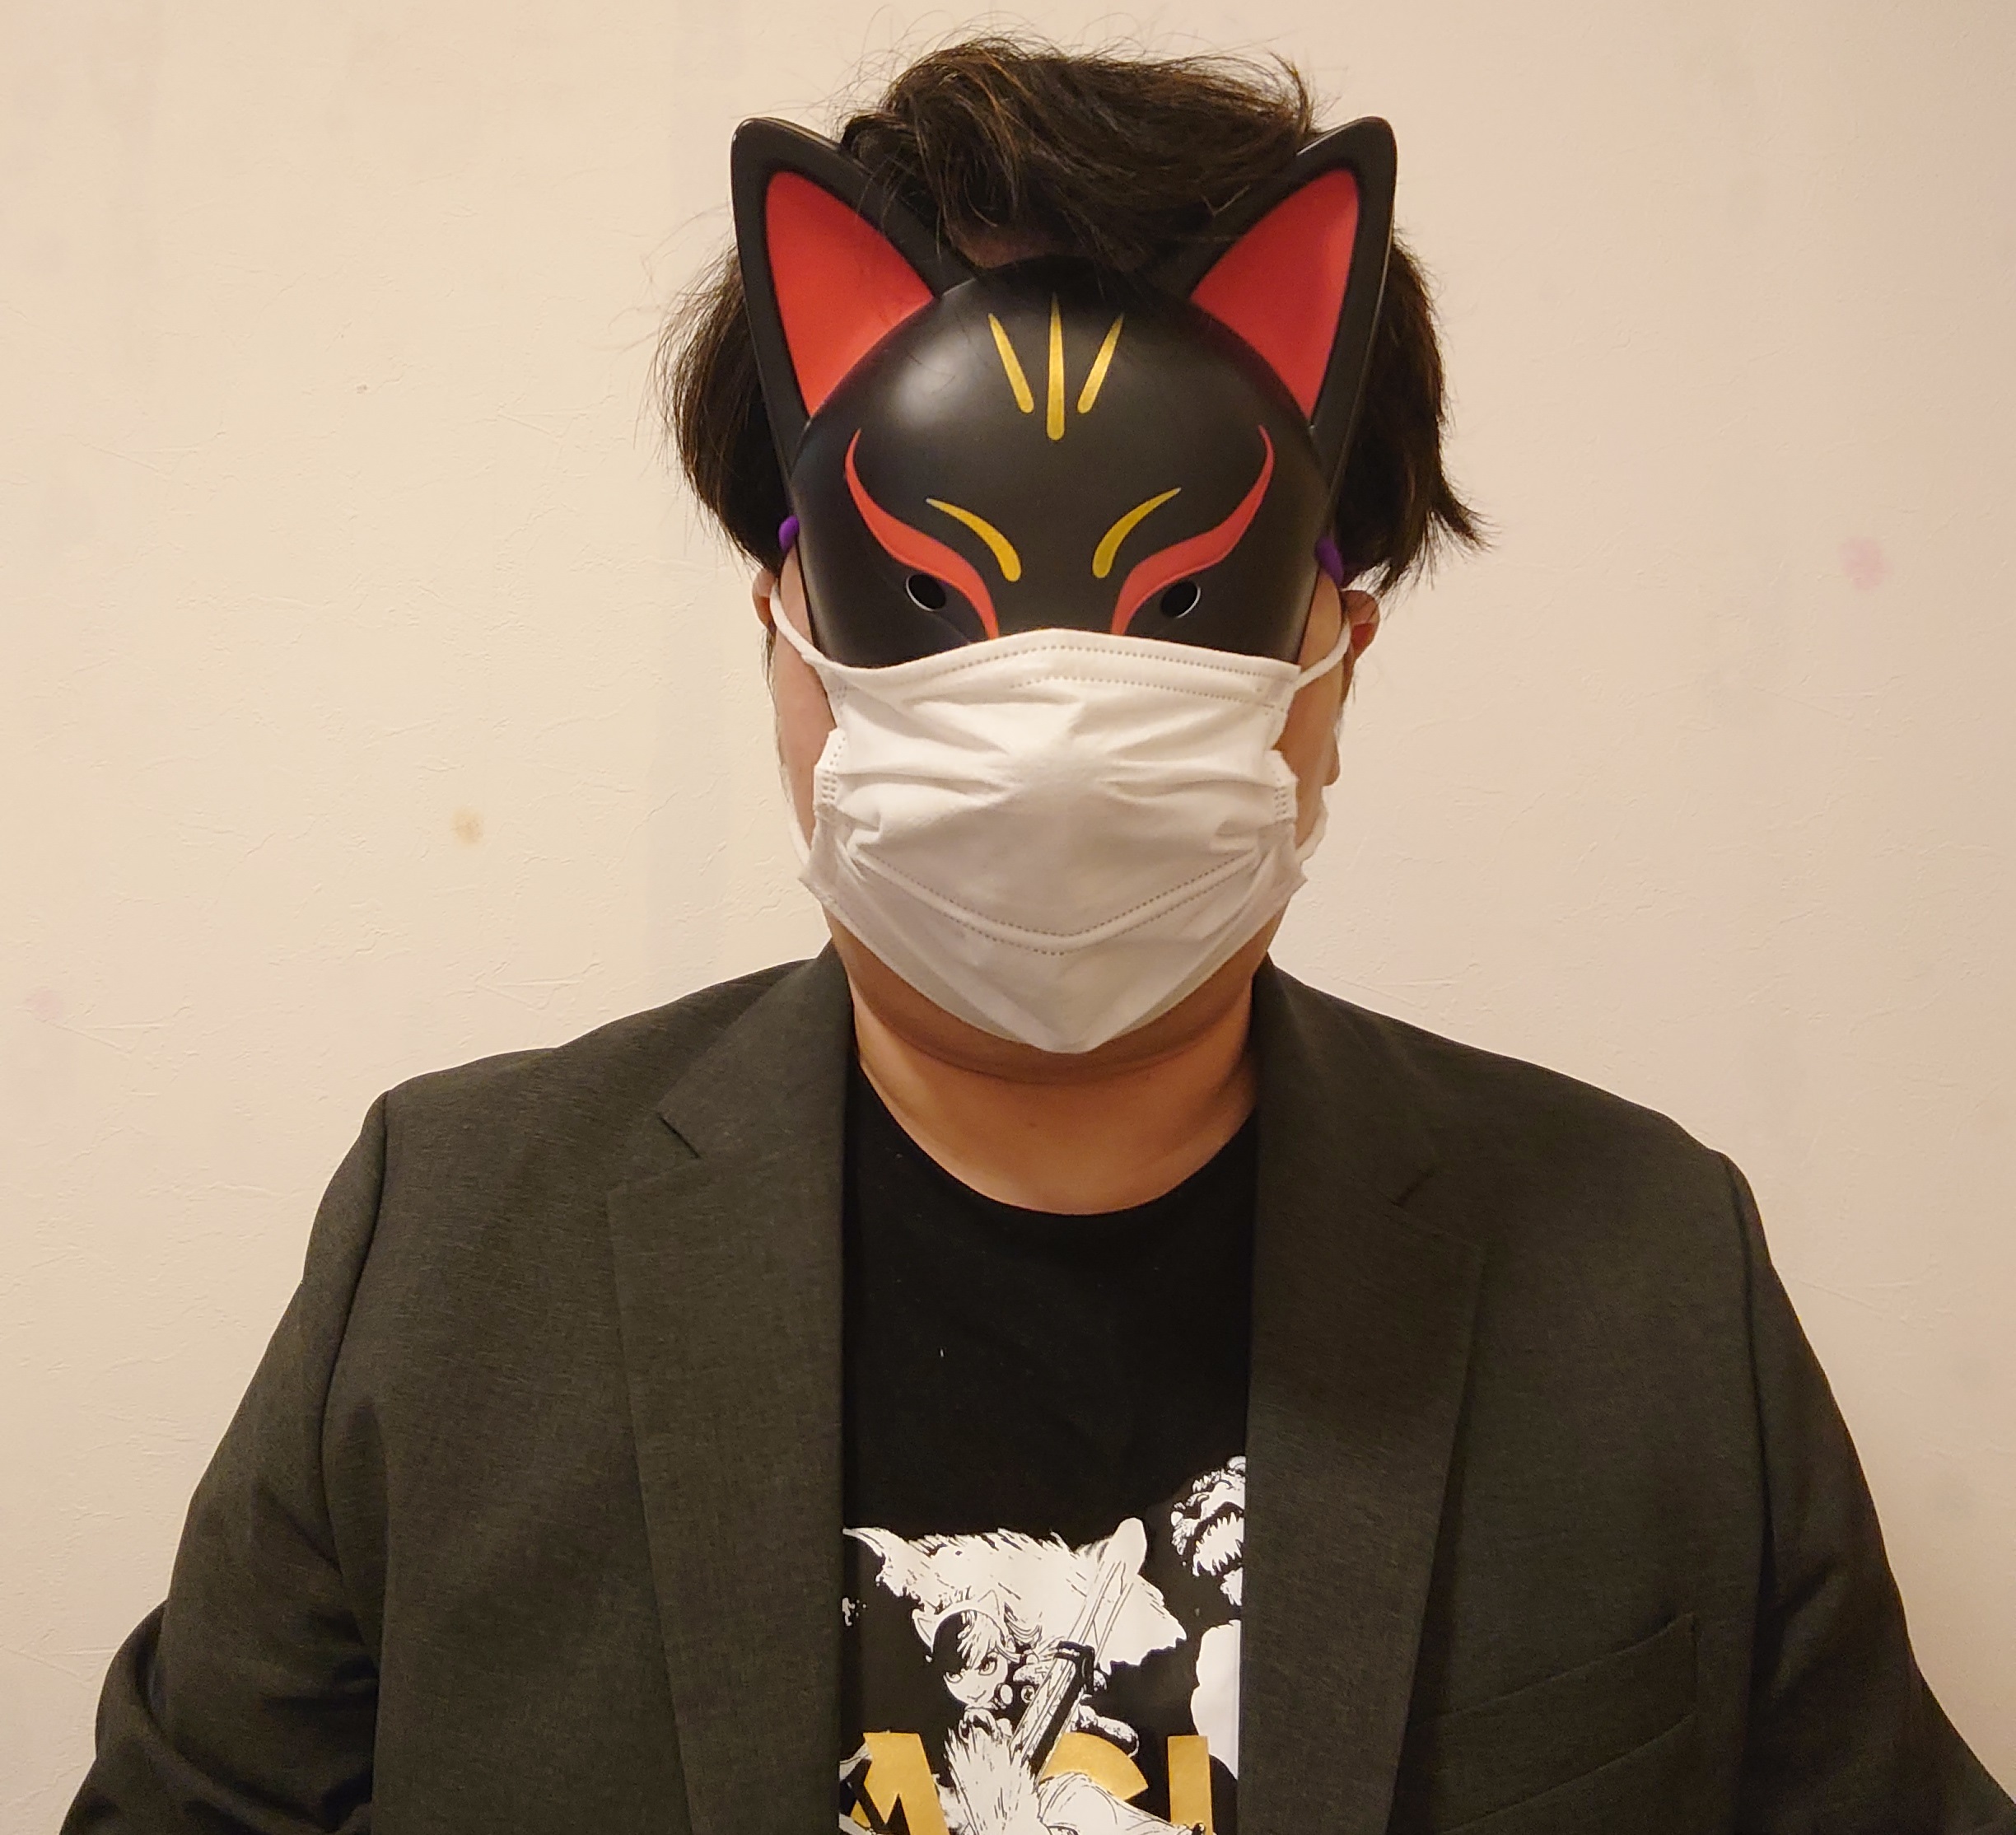
いつも冒頭に自分の写真を載せているのですが、
今回は見るに堪えれる写真ではなかったのでぼかしを入れました。

使用サービス:Novel AI(https://novelai.net/)
こっちは私の写真をもとにAIが作成した画像です。
今回のアイキャッチも同様にAIで作りました。
Midjourneyも使いたいから契約してくれ、会社。
さて皆さんは、コミュニティに所属、してますか?
私もいろいろなコミュニティに所属し、日夜熱い討論等を繰り広げているのですが、そうするとアレがだるいですよね。

利用してるアプリが全部違う!!!!!!!!!
あのグループはSlackで、あっちはDiscordでー、そっちはTwitter、ってやってられないっすわ。
もう無理なんよ。どれか一つのプラットフォームでやってくれ。
なので、今回はとりあえずTwitterとDiscordをつなげて、確認しなきゃいけないモノを減らそうと画策してみます。
1. Twitter APIを利用するためのアレコレを集める
まずは下記の4つを集めてきてください。ここではその方法は解説しません。
すでに解説記事はいっぱいあるし、長くなっちゃうからね。
- APIキー
- APIシークレット
- アクセストークン
- アクセストークントークン
2. DiscordのBotを作る
兎にも角にも、DiscordのBotを用意しないことには始まりません。ので、解説していきます。
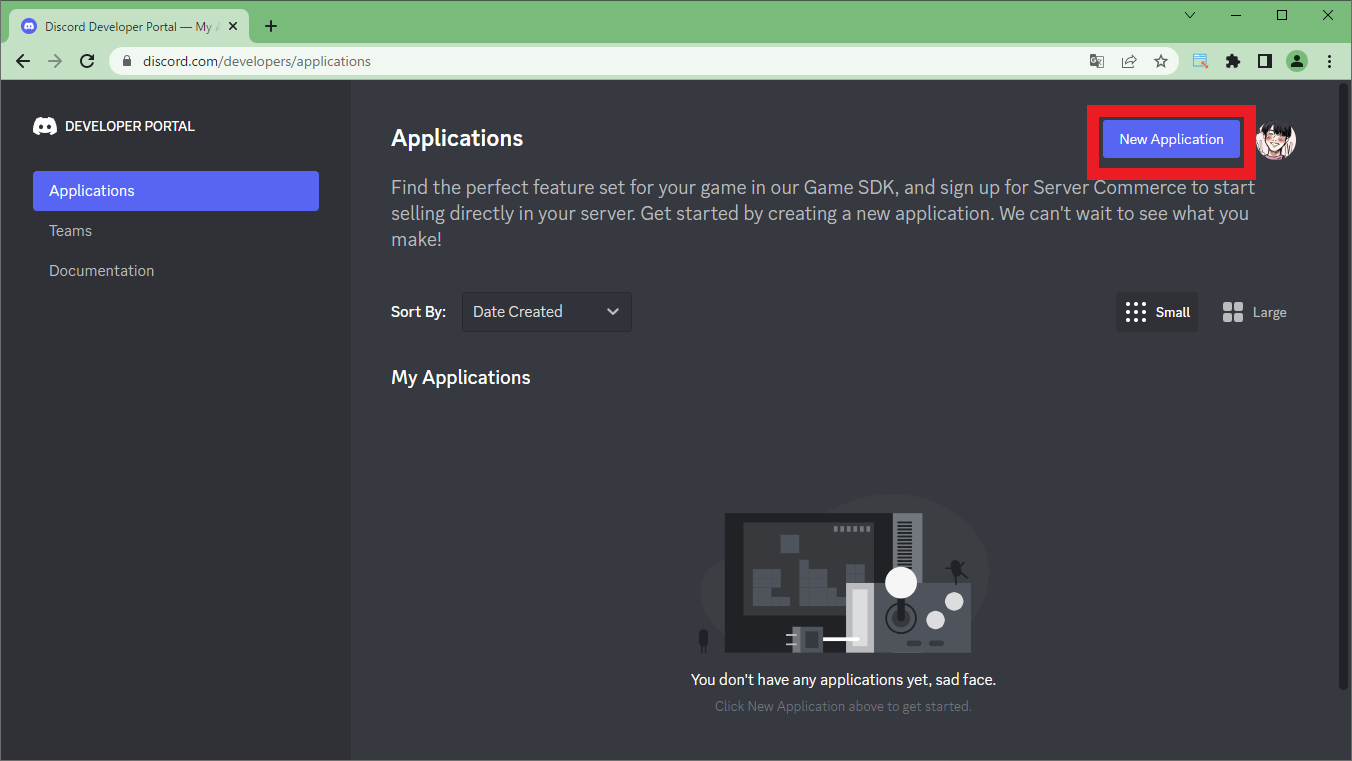
2-1. https://discord.com/developers/applicationsにアクセスし、[New Application]をクリック。
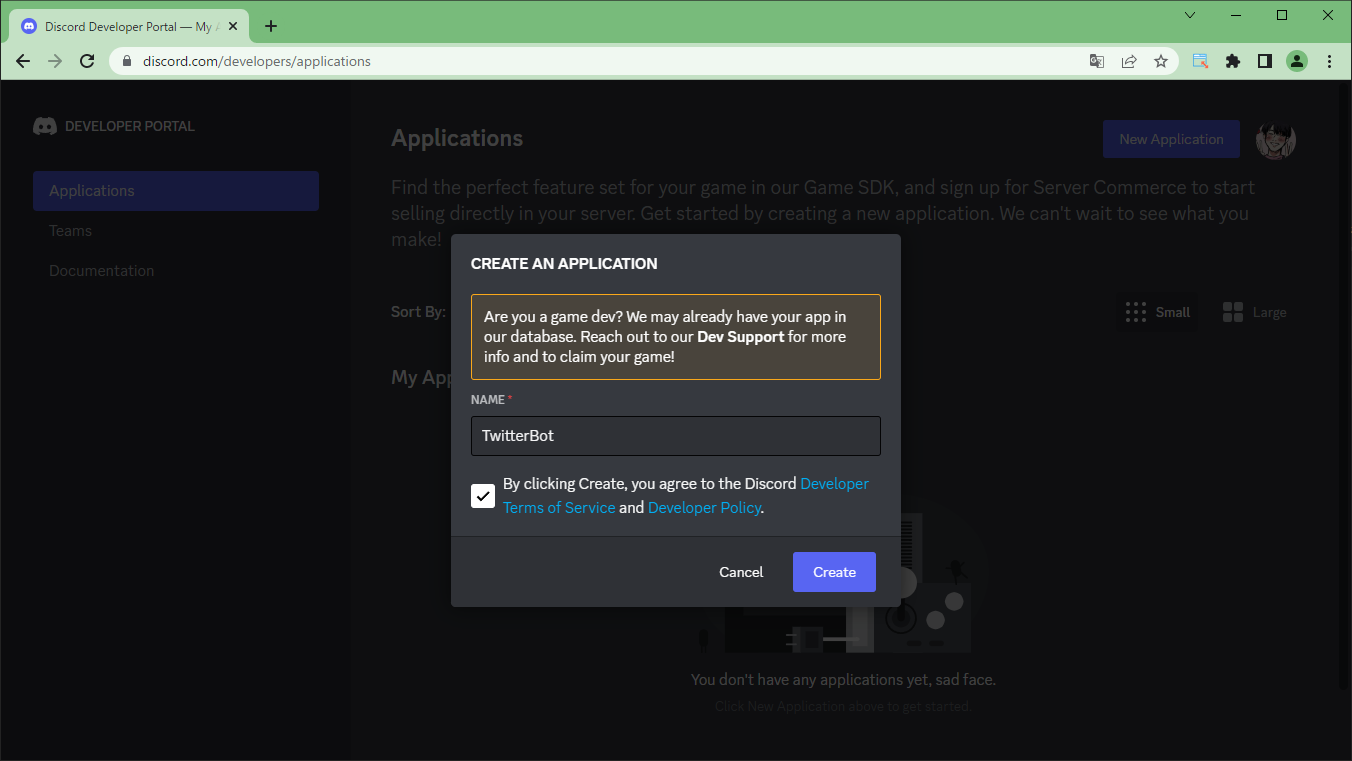
2-2. Botの名前を決めて、ポリシーのチャックを入れ、[Create]をクリック。
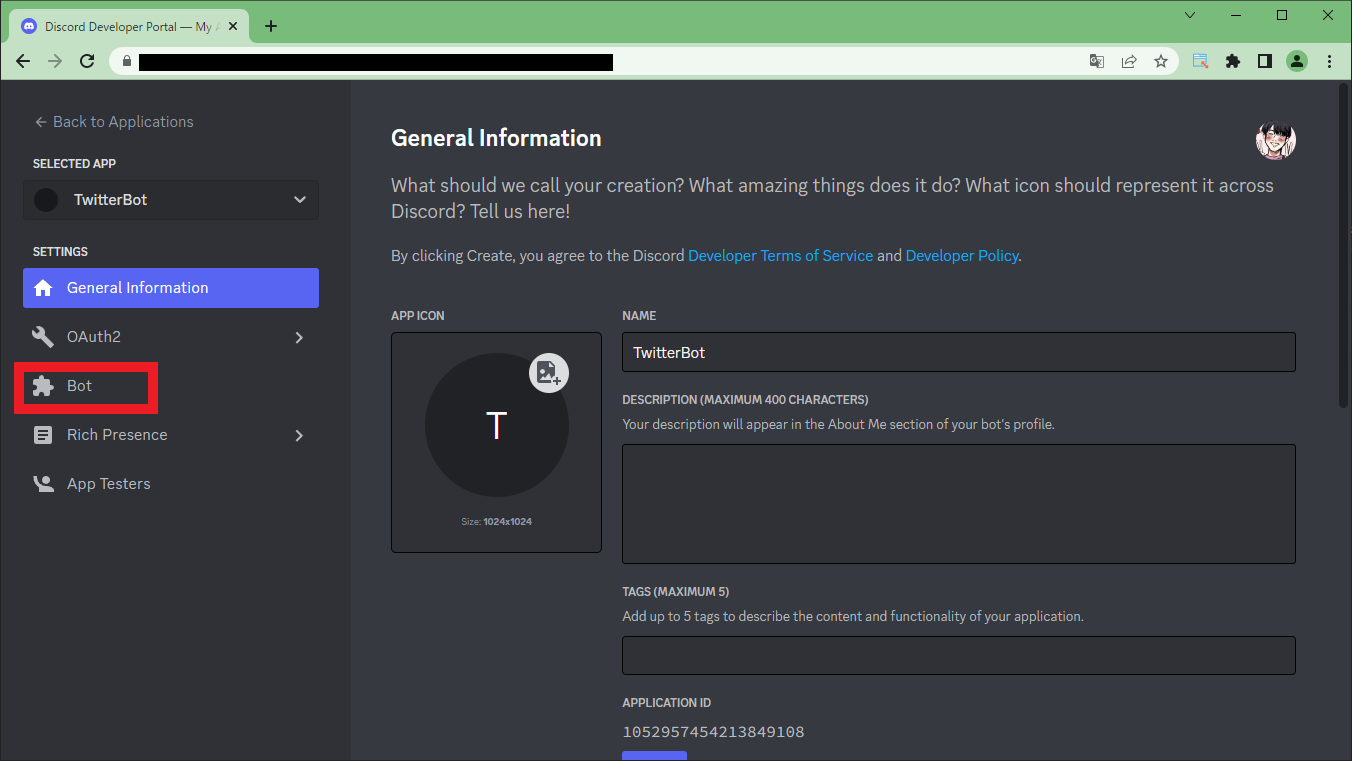
2-3. 作成が完了したら[Bot]をクリック。
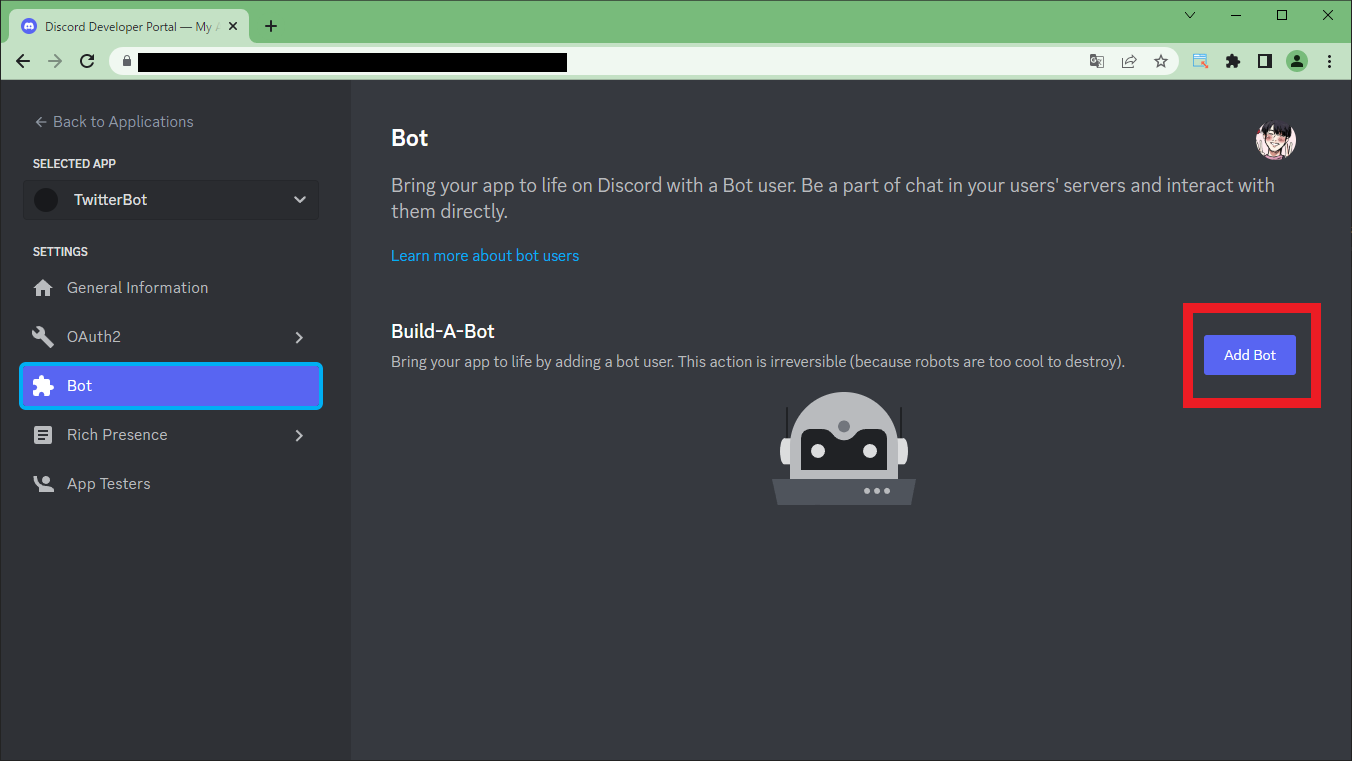
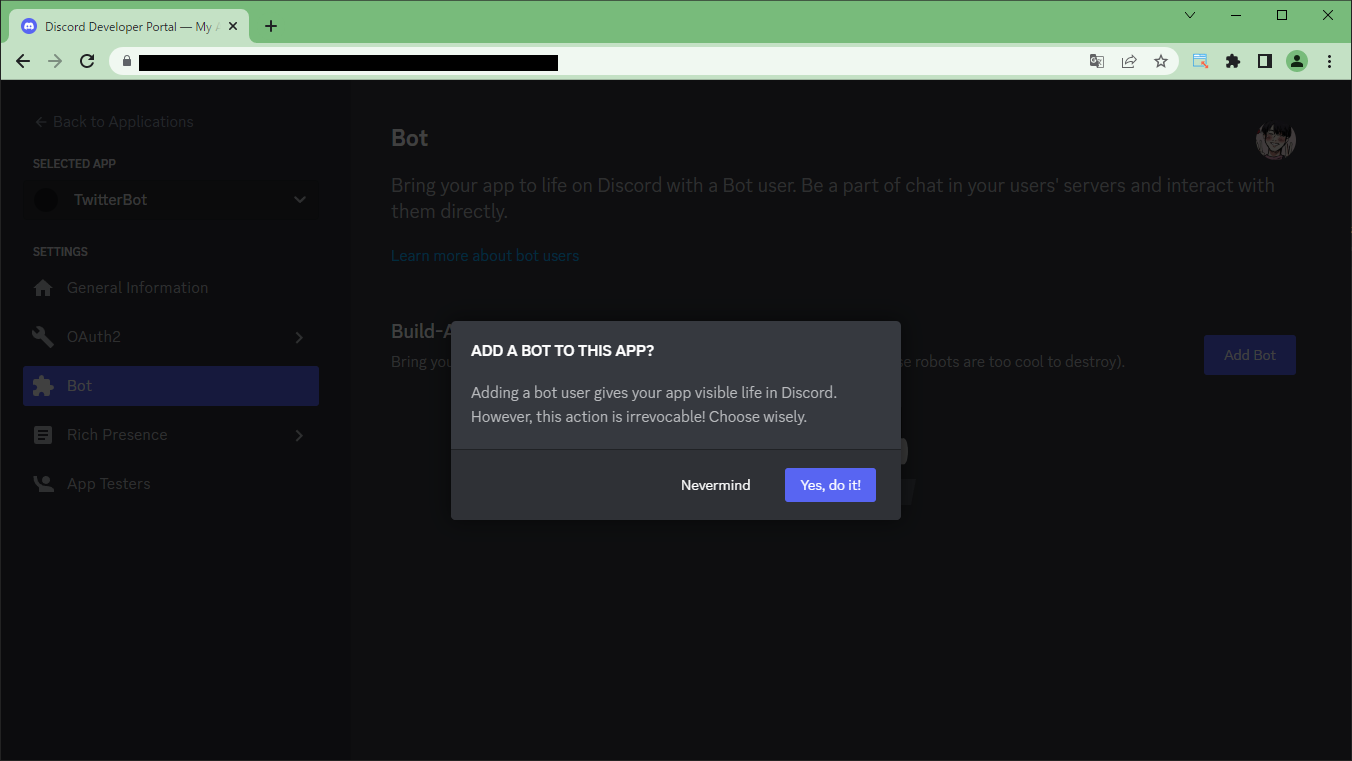
2-4. [Add Bot]をクリック。

2-5. [Yes, do it!]をクリック
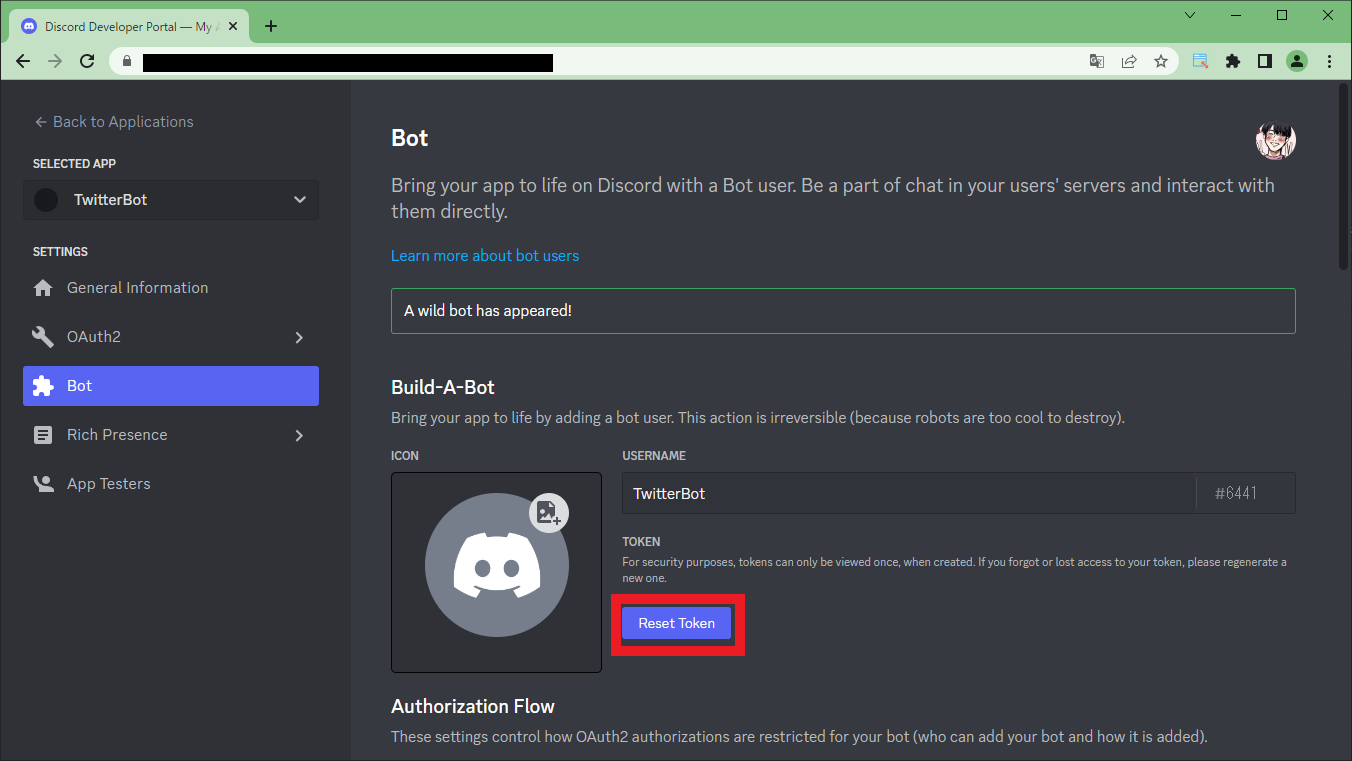
2-6. [Reset Token]をクリック。
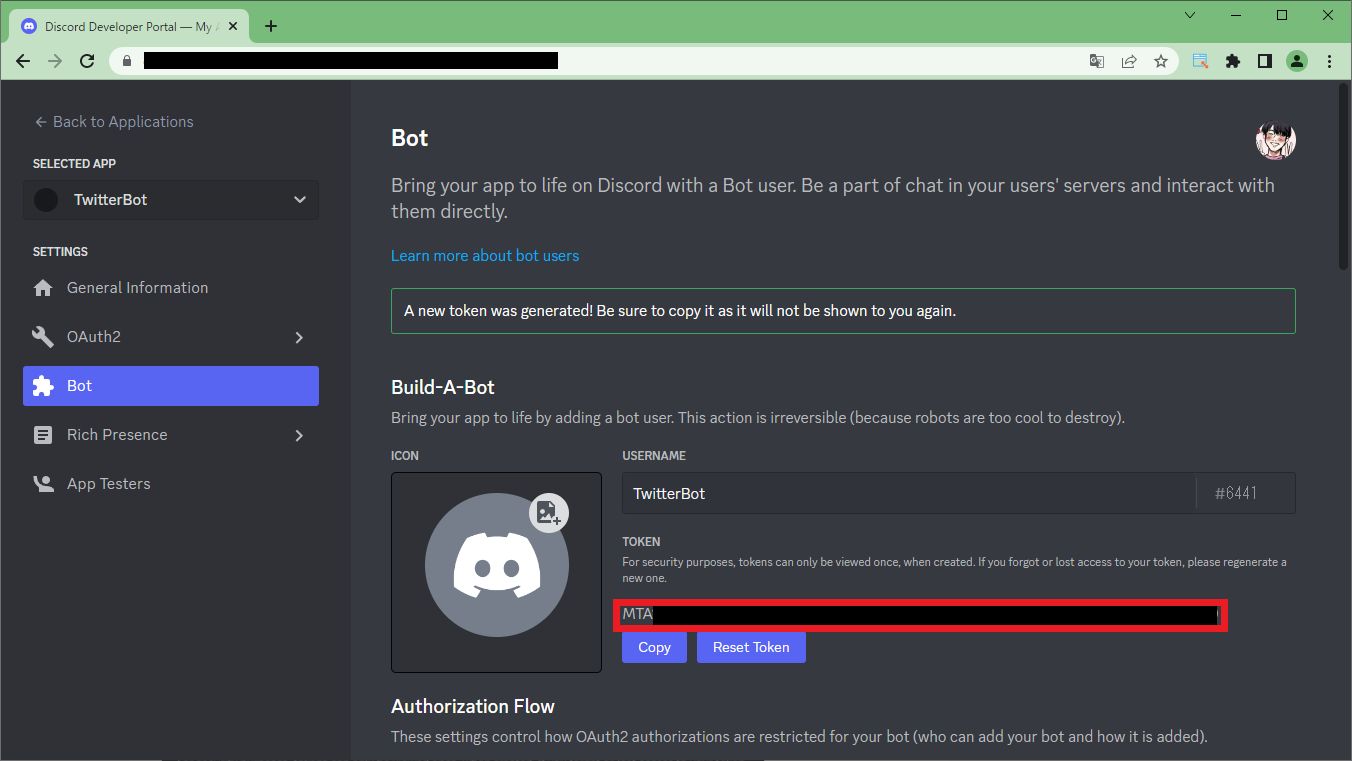
2-7. トークンが表示されるので、これをコピー。
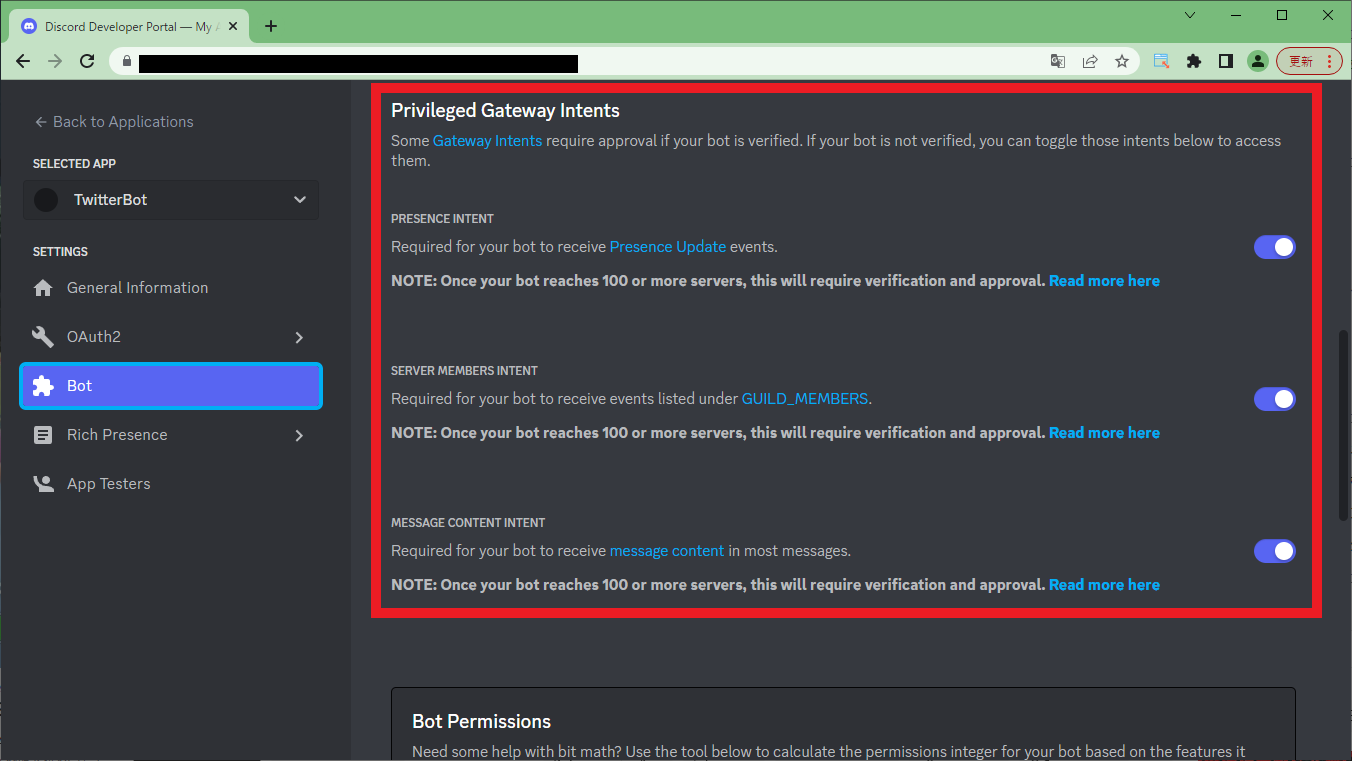
2-8. [Privileged Gateway Intents]の項目を3つともON。
2-9. [OAuth2]-[URL Generator]-[Bot]を選択。
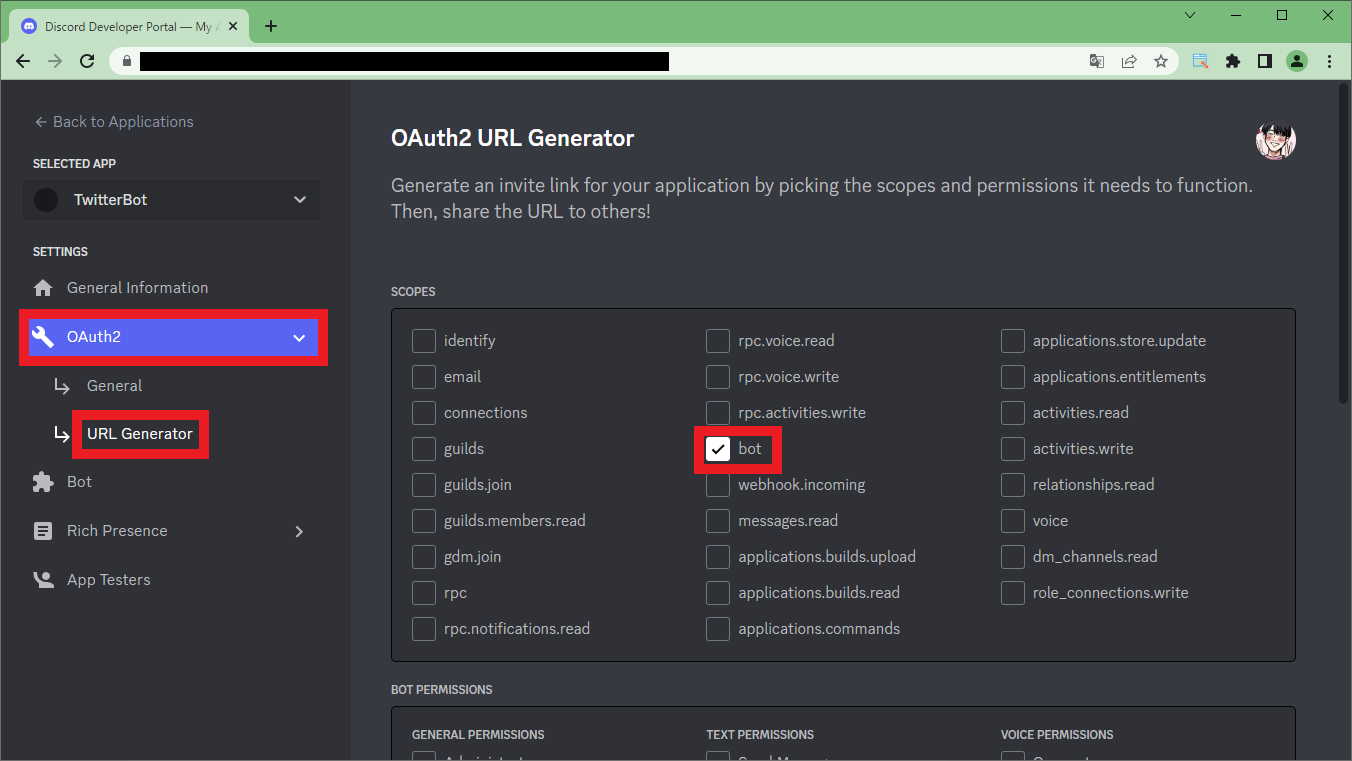
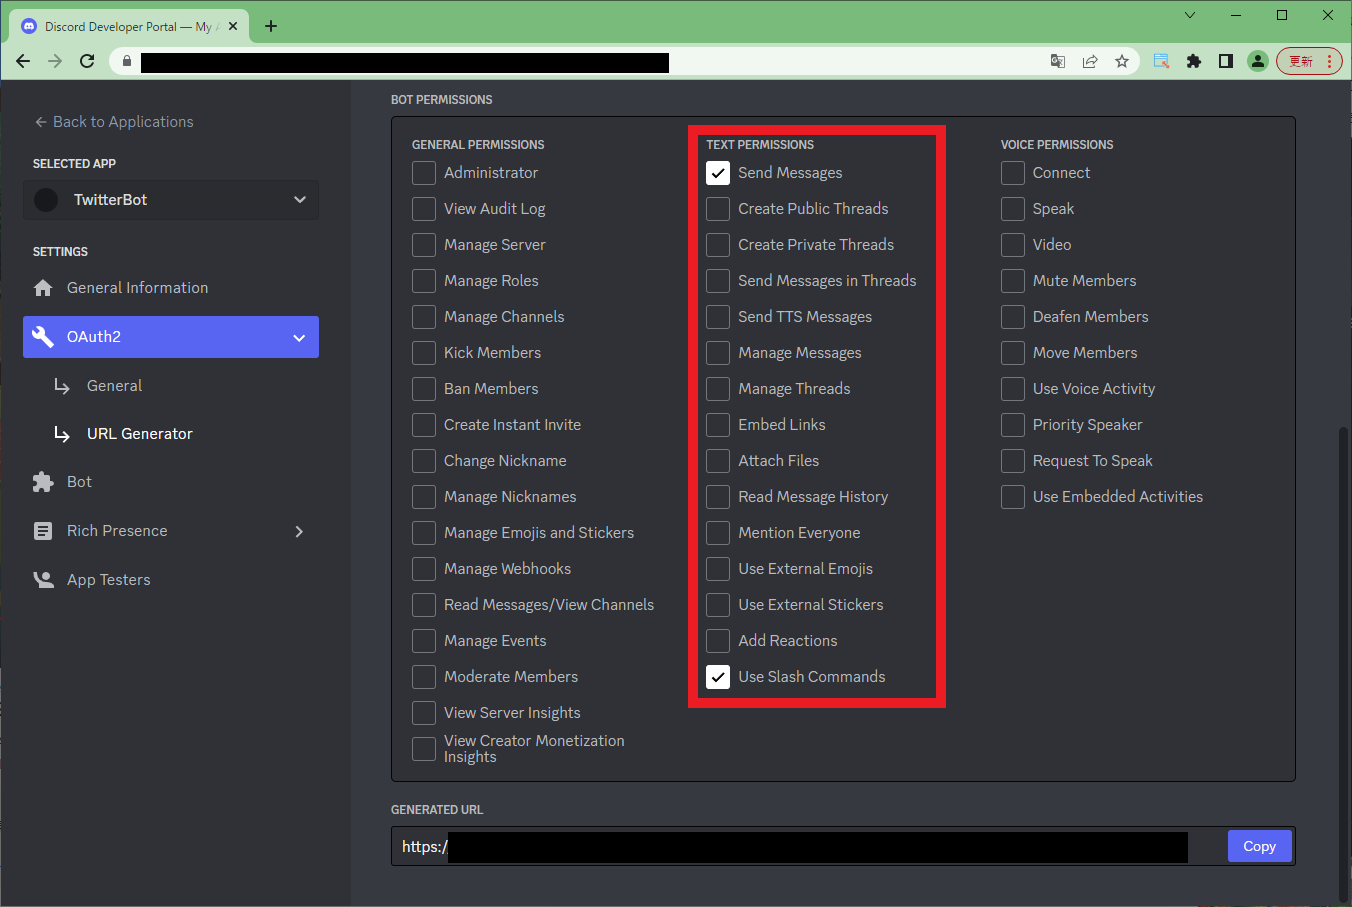
2-10. [Bot]と[Use Slash Commands]を選択し、URLをコピー。
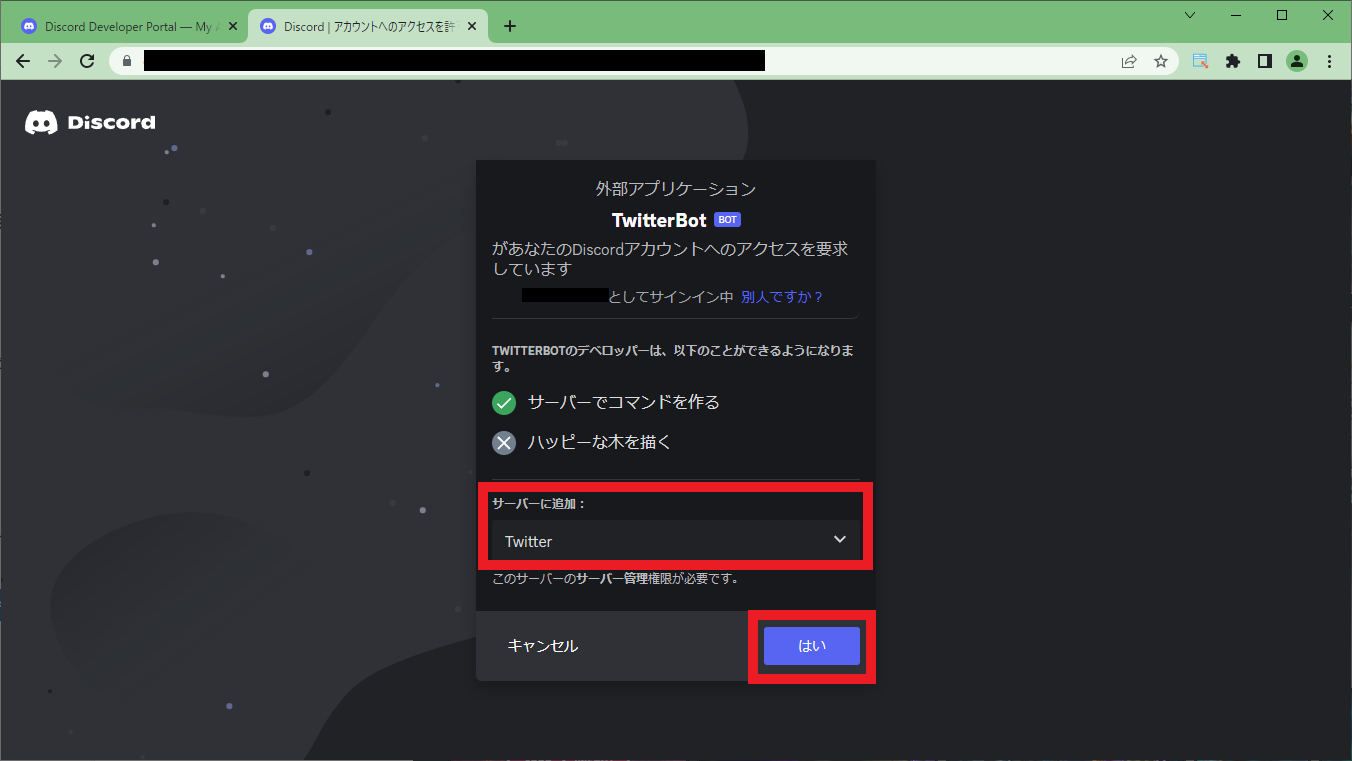
2-11. URLにアクセスして任意のサーバー(今回は予め作成した[Twitter]サーバー)を選択し、[はい]をクリック。
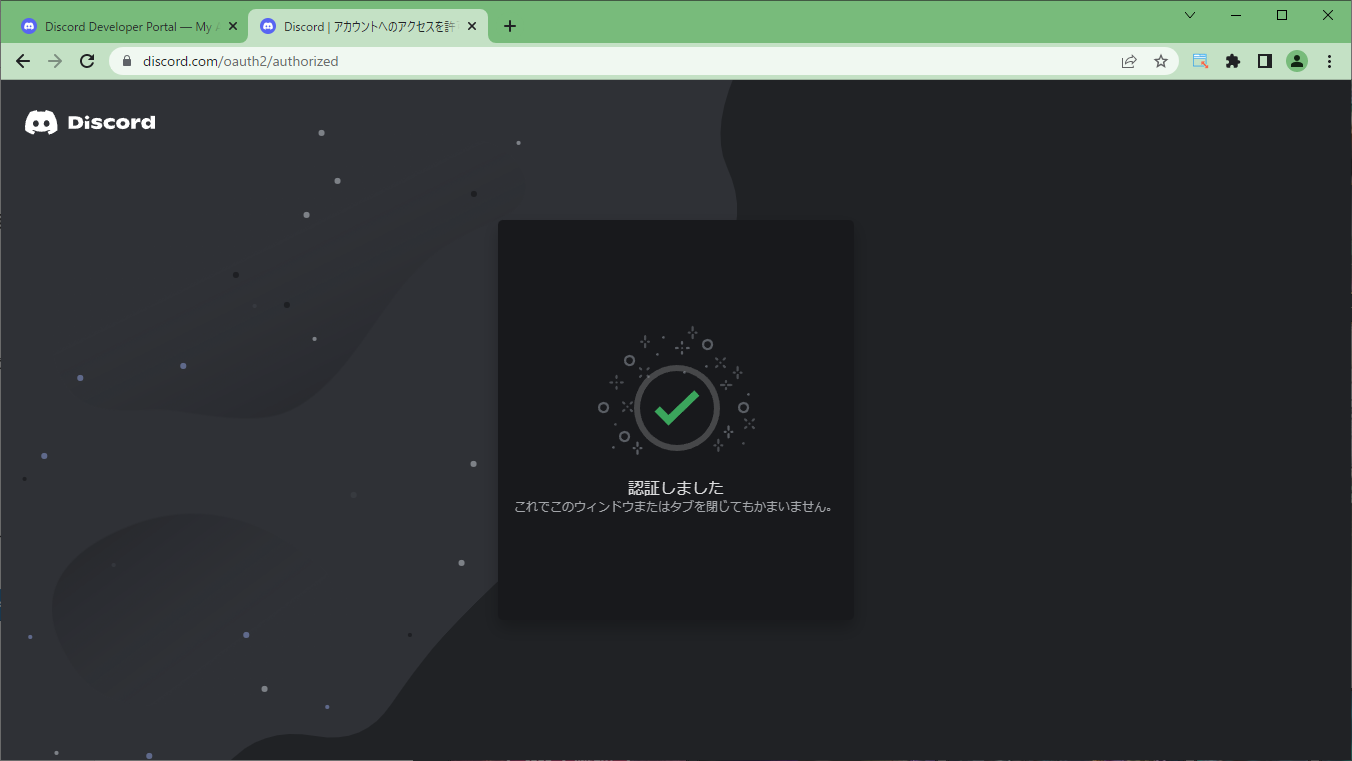
2-12. [認証]をクリック。
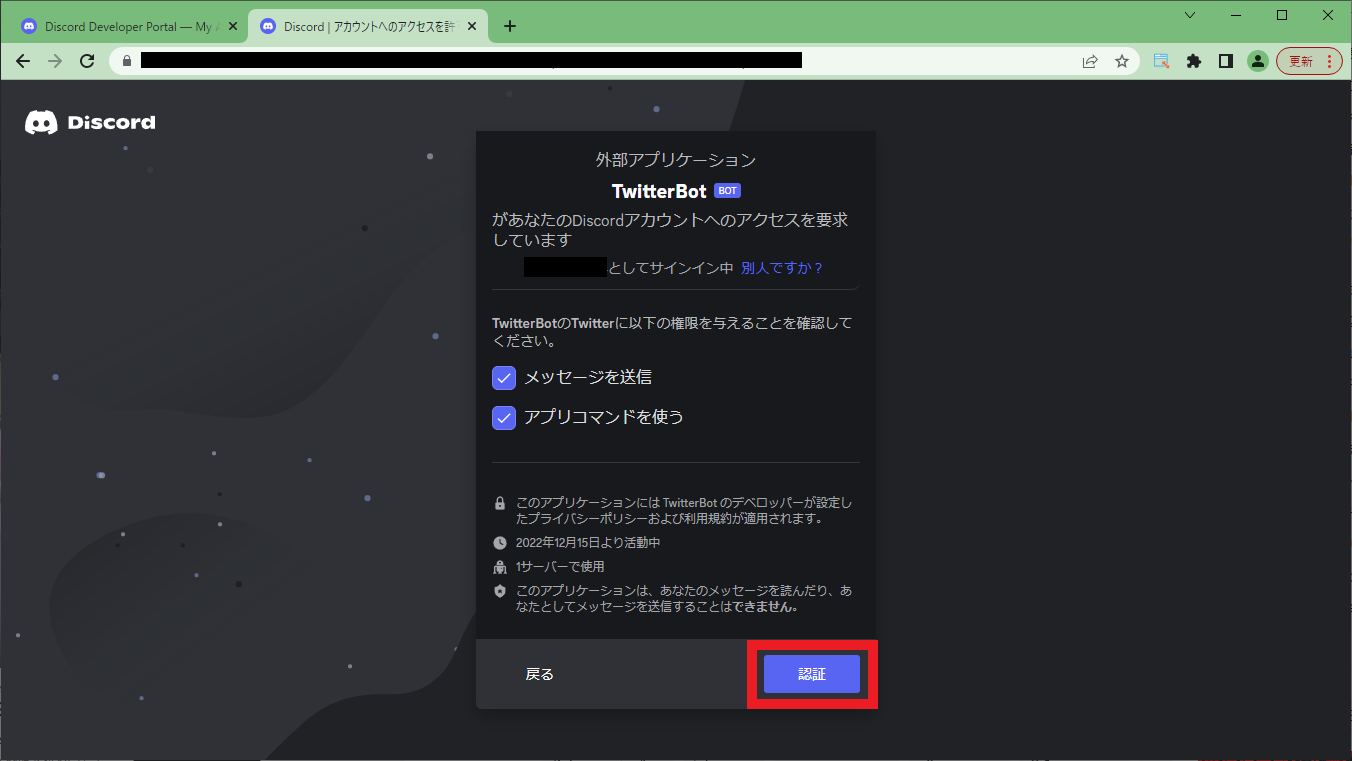
2-12. 「認証しました」と表示されたら、サーバーにBotが追加されています。
2-13. DiscordのTwitterサーバーを確認すると作成したBotが追加されていることを確認できます。
[歯車アイコン]をクリック。
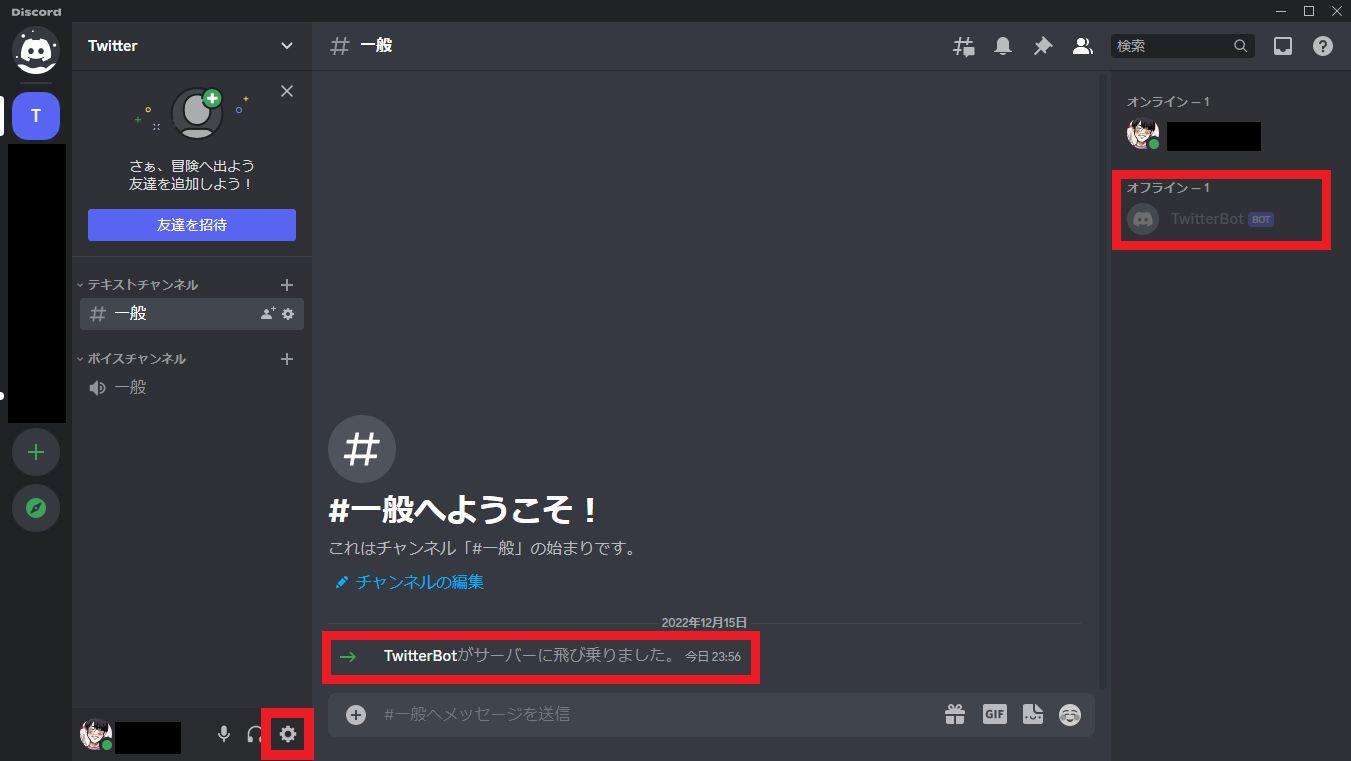
2-14. [詳細設定]-[開発者モード]をON。

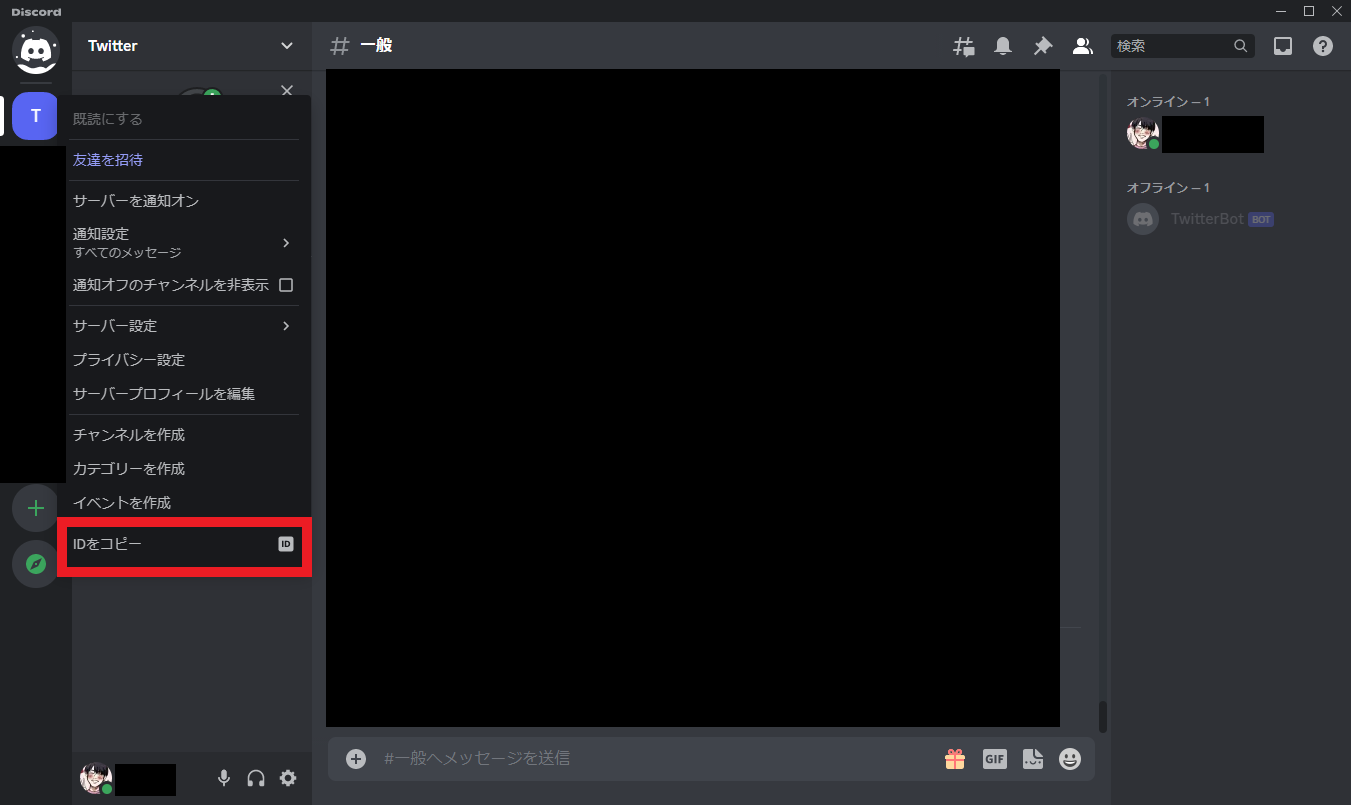
2-15. サーバーを右クリックして[IDをコピー]をクリック。これがサーバーのIDです。
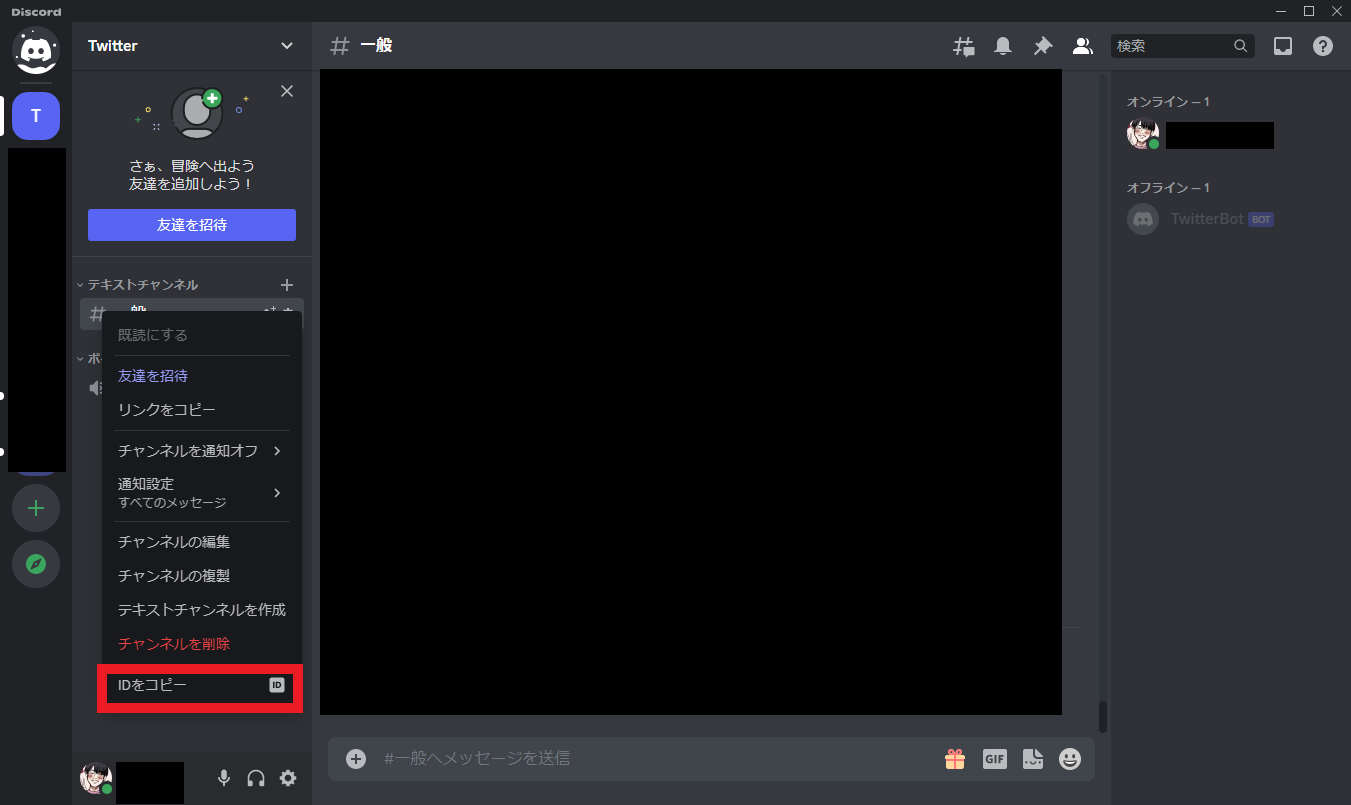
2-16. チャンネルを右クリックして[IDをコピー]をクリック。これがチャンネルのIDです。
3. DiscordとTwitterを繋げましょうよ
ここまでで必要な作業は大体終わりました。あとはTwitterBot君に命を吹き込むだけです。
今回は毎分タイムラインのツイートを200件持ってきて、チャンネルでそれを発言させる機能とTwitterに投稿する機能を持たせたコードを作りました。
ここまでで集めたモノをおさらいしましょう。
・Twitter APIキー
・Twitter APIシークレット
・Twitter アクセストークン
・Twitterアクセストークンシークレット
・Discord トークン
・Discord サーバーID
・Discord チャンネルID
これらを下記のコードに埋め込んで実行すればTwitterBot君が目覚めます。
Pythonimport discord
from discord import Intents, Client, Interaction
from discord.app_commands import CommandTree
from discord.ext import tasks

import tweepy


DISCORD_TOKEN = {Discord トークン}
TWITTER_API_KEY = {Twitter APIキー}
TWITTER_API_SECRET = {Twitter APIシークレット}
TWITTER_ACCESS_TOKEN = {Twitter アクセストークン}
TWITTER_ACCESS_TOKEN_SECRET = {Twitterアクセストークンシークレット}

SERVER_ID = discord.Object(id={Discord サーバーID})
CHANNEL_ID = {Discord チャンネルID}

class MyClient(Client):
    def __init__(self, intents: Intents) -> None:
        super().__init__(intents=intents)
        self.tree = CommandTree(self)

    async def setup_hook(self) -> None:
        self.tree.copy_global_to(guild=SERVER_ID)
        await self.tree.sync(guild=SERVER_ID)

    async def on_ready(self):
        print(f"login: {self.user.name} [{self.user.id}]")
        self.channel = self.get_channel(CHANNEL_ID)

    @tasks.loop(seconds=60)
    async def checkCanStop(self):
        tweets = api.home_timeline(since_id=self.id, count=200)
        for num, tweet in enumerate(tweets):
            if num == 0:
                self.id = tweet.id
            await self.channel.send(tweet.user.name + "\n" + tweet.text)


intents = Intents.default()
client = MyClient(intents=intents)

auth = tweepy.OAuth1UserHandler(
    TWITTER_API_KEY,
    TWITTER_API_SECRET,
    TWITTER_ACCESS_TOKEN,
    TWITTER_ACCESS_TOKEN_SECRET
)
api = tweepy.API(auth)

tweets = api.home_timeline(count=1)
id =  tweets.since_id

@client.tree.command()
async def start(interaction: Interaction):
    await interaction.response.send_message("started")
    client.checkCanStop.start()

@client.tree.command()
async def stop(interaction: Interaction):
    await interaction.response.send_message("stop")
    client.checkCanStop.cancel()

@client.tree.command()
async def tweet(interaction: discord.Interaction, text: str):
    """Adds two numbers together."""
    api.update_status(text)
    await interaction.response.send_message("tweeted " + text)

client.run(DISCORD_TOKEN)
ざっくりとコードの解説をしていきます。
Bot起動時の処理がこのあたりで、必要な情報を取得しています。
Pythonintents = Intents.default()
client = MyClient(intents=intents)

auth = tweepy.OAuth1UserHandler(
    TWITTER_API_KEY,
    TWITTER_API_SECRET,
    TWITTER_ACCESS_TOKEN,
    TWITTER_ACCESS_TOKEN_SECRET
)
api = tweepy.API(auth)

tweets = api.home_timeline(count=1)
id =  tweets.since_id
Python def __init__(self, intents: Intents) -> None:
super().__init__(intents=intents)
self.tree = CommandTree(self)
async def setup_hook(self) -> None:
self.tree.copy_global_to(guild=SERVER_ID)
await self.tree.sync(guild=SERVER_ID)
async def on_ready(self):
print(f"login: {self.user.name} [{self.user.id}]")
self.channel = self.get_channel(CHANNEL_ID)/startコマンドが行われると、それをトリガーとして毎分のツイート取得が始まります。
Python@client.tree.command()
async def start(interaction: Interaction):
    await interaction.response.send_message("started")
    client.checkCanStop.start()
Python @tasks.loop(seconds=60)
async def checkCanStop(self):
tweets = api.home_timeline(since_id=self.id, count=200)
for num, tweet in enumerate(tweets):
if num == 0:
self.id = tweet.id
await self.channel.send(tweet.user.name + "\n" + tweet.text)/stopコマンドが行われるとツイートの取得が止まります。
Python@client.tree.command()
async def stop(interaction: Interaction):
    await interaction.response.send_message("stop")
    client.checkCanStop.cancel()
/tweet {つぶやきたい内容}でDiscordからツイートをすることもできちゃいます。
Python@client.tree.command()
async def tweet(interaction: discord.Interaction, text: str):
    """Adds two numbers together."""
    api.update_status(text)
    await interaction.response.send_message("tweeted " + text)
4. Botを動かしてみよう
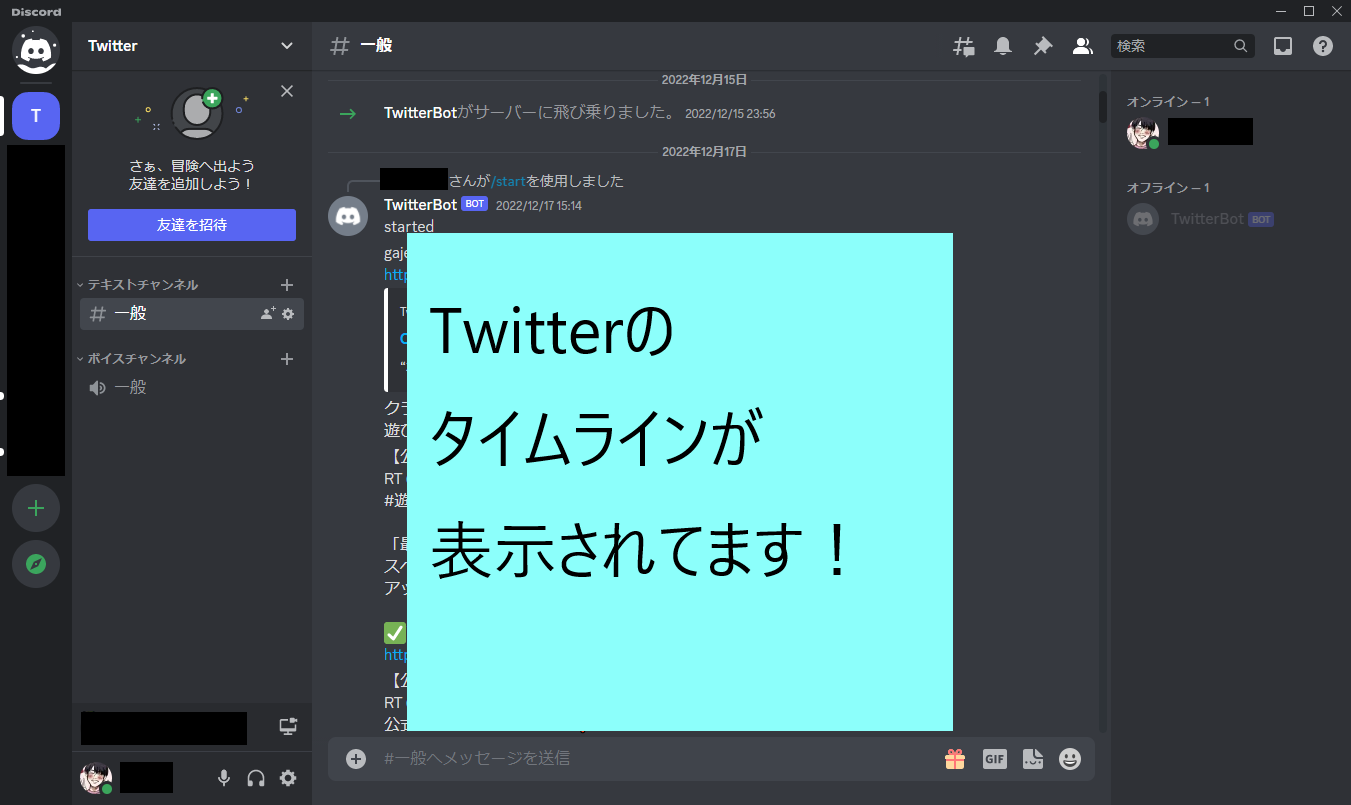
/start コマンドでツイートの取得が始まり、どんどんチャンネルに投稿されていきます。
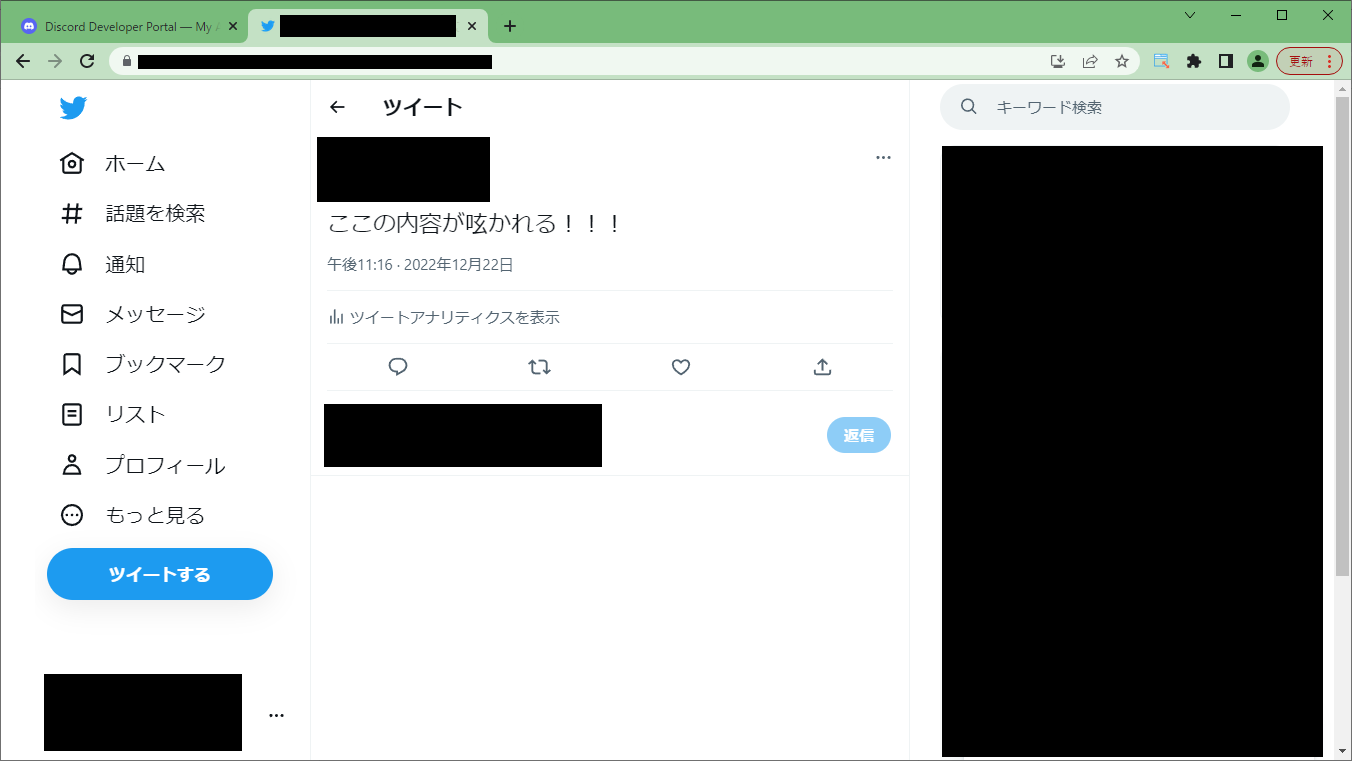
/tweet コマンドでツイートしてみます。
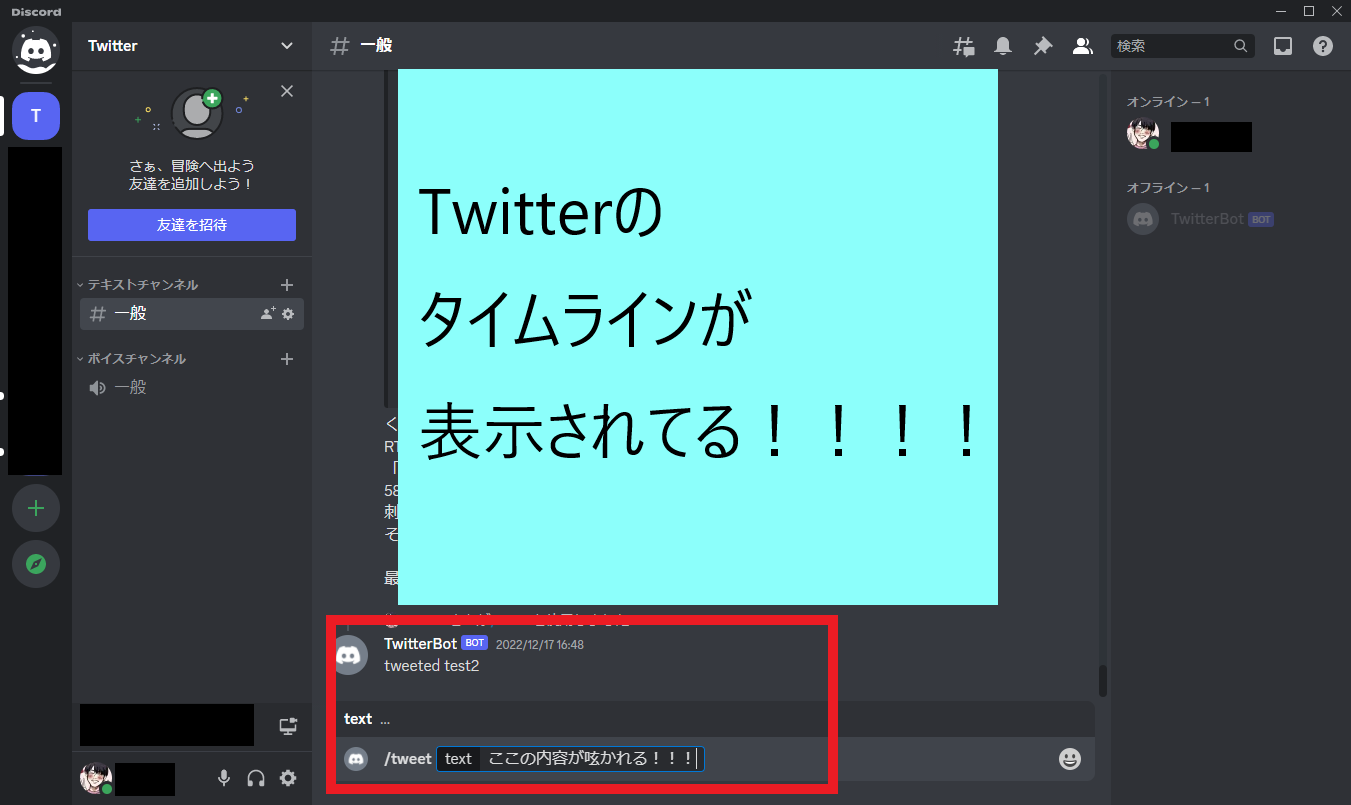
つぶやかれた。やったね。
まとめ
実際タイムラインの取得が毎分だと微妙ですね。
ただ、DMとかも取得できるので、そこでコミュニティを形成している場合とかは、Discordに流すのもいいんじゃないかなって思います。
私は連絡する友だちがいないのでどれも使いませんが。
はーあ。
メリークリスマス!!


![Microsoft Power BI [実践] 入門 ―― BI初心者でもすぐできる! リアルタイム分析・可視化の手引きとリファレンス](/assets/img/banner-power-bi.c9bd875.png)
![Microsoft Power Apps ローコード開発[実践]入門――ノンプログラマーにやさしいアプリ開発の手引きとリファレンス](/assets/img/banner-powerplatform-2.213ebee.png)
![Microsoft PowerPlatformローコード開発[活用]入門 ――現場で使える業務アプリのレシピ集](/assets/img/banner-powerplatform-1.a01c0c2.png)