2025-05-14

※ この記事は個人でも投稿予定です。
はじめに
個人開発を進める中で、これまでテストにはあまり力を入れていませんでしたが、そろそろ品質向上も意識したいと考え、テストについて学び始めました。
今回の記事ではNext.jsでコーディングスタイルのチェックなど、簡単な静的テストの環境構築とGitHub Actionsによる自動化をやっていきます。
まずはNext.jsのセットアップから始め、Prettierの導入とESLint連携を行います。
その後、huskyとlint-stagedを利用してコミット時に自動的にリントとフォーマットが実行されるよう設定します。
最後にGitHub Actionsでもリントやビルドを実行するようにして完了です。
動作環境
今回の記事の動作環境は以下の通りです。
- Node.js: v22.14.0
- pnpm: 10.7.1
- Next.js: 15.3.1
フロントエンドのテスト戦略について
テスト戦略の1つに「Testing Trophy」という考え方があるそうです。
これは単体テストを軸に結合テストやシステムテストを行う「Test Pyramid」と異なり、静的テストを基盤として結合テストの比率を多くする戦略です。
フロントエンドのテストについて調べている際によく目にしました。
(最近はE2Eテストツールが成熟してきているため、システムテストを多く行おう。という考え方も目にしました。テストの比率よりもいかに適切なテストを行うのかが大切かもしれません。)
今回はNext.jsのテスト環境のため、フロントエンドのテストを調べる際に最も多く目にした「Testing Trophy」の考えを採用することにしました。
結合テストを多く行う利点について以下のように説明されています。
Integration tests strike a great balance on the trade-offs between confidence and speed/expense. This is why it's advisable to spend most (not all, mind you) of your effort there.
さっそく結合テストの環境を整えたいところですが、まずはその基盤となる静的テストの環境を整えていきます。
Next.jsのセットアップ
普段フロントエンドにはNext.jsを採用しているので、Getting Started: Installation | Next.jsを参考にセットアップを行います。
パッケージマネージャーはpnpmです。
pnpm dlx create-next-app@latest my-project
Packages: +1
+
Progress: resolved 1, reused 0, downloaded 1, added 1, done
✔ Would you like to use TypeScript? … No / Yes
✔ Would you like to use ESLint? … No / Yes
✔ Would you like to use Tailwind CSS? … No / Yes
✔ Would you like your code inside a `src/` directory? … No / Yes
✔ Would you like to use App Router? (recommended) … No / Yes
✔ Would you like to use Turbopack for `next dev`? … No / Yes
✔ Would you like to customize the import alias (`@/*` by default)? … No / Yes
Creating a new Next.js app in /Users/xxx/my-project.

cd my-project
ls
README.md          next-env.d.ts      node_modules       pnpm-lock.yaml     public             tsconfig.json
eslint.config.mjs  next.config.ts     package.json       postcss.config.mjs src
インストールの際に提示された選択肢はすべてデフォルトを選びました。
これにてNext.jsのセットアップは完了です。
PrettierのセットアップとESLint連携
Prettierのインストール
続いてコードフォーマッターのPrettierをセットアップします。
セットアップ手順はInstall · Prettierを参考にします。
pnpm add --save-dev --save-exact prettier

node --eval "fs.writeFileSync('.prettierrc','{}\n')"
node --eval "fs.writeFileSync('.prettierignore','# Ignore artifacts:\nbuild\ncoverage\n')"
今まで知らなかったのですが、--save-exactまたは-Eを指定するとバージョンを固定してインストールできるそうです。
バージョンの統一という意味でも積極的に使用した方がいいオプションかもしれません。
これでPrettierのインストールは完了です。
なお上記のコードブロックにはインストール手順としてドキュメントの内容をそのまま記載しましたが、.prettierrcと.prettierignoreは必要に応じてカスタマイズしました。
ESLintと連携させる
Prettierを実行する前に、Next.jsをセットアップした際に同時にインストールされたESLintと連携できるようにします。
ESLintと連携する必要がある理由については以下のドキュメントに記載されています。
ESLint also contains code formatting rules, which can conflict with your existing Prettier setup. We recommend including eslint-config-prettier in your ESLint config to make ESLint and Prettier work together.
https://nextjs.org/docs/app/api-reference/config/eslint#with-prettier
ESLintとPrettierのルールが競合しないように、eslint-config-prettierをインストールします。
pnpm add --save-dev eslint-config-prettier続いて、eslint.config.mjsを編集してeslint-config-prettierを有効にします。
なお以下のコードはNext.jsをセットアップする際にTypeScriptを有効にした場合のeslint.config.mjsをベースとしています。
上記引用に記載されているリンクの内容とは異なるため注意してください。
# eslint.config.mjs
import { dirname } from 'path';
import { fileURLToPath } from 'url';
import { FlatCompat } from '@eslint/eslintrc';

const __filename = fileURLToPath(import.meta.url);
const __dirname = dirname(__filename);

const compat = new FlatCompat({
  baseDirectory: __dirname,
});

const eslintConfig = [
  ...compat.extends('next/core-web-vitals', 'next/typescript', 'prettier'),
];

export default eslintConfig;
Prettierの実行
ESLintとの連携ができました。
最後に以下のコマンドを実行するとPrettierのルールに従ってコードがフォーマットされます。
pnpm exec prettier . --writehusky + lint-stagedのセットアップ
最終的にはGitHub Actionsでコードスタイルのチェックを行いますが、少しでも弾かれる可能性を減らすためにコミット時に自動的にESLintとPrettierが実行されるようにしたいです。
今回はInstall · Prettier - Git hooksセクションを参考にhuskyとlint-stagedのセットアップを行います。
pnpm add --save-dev husky lint-staged
pnpm exec husky init
node --eval "fs.writeFileSync('.husky/pre-commit','pnpm exec lint-staged\n')"
必要なパッケージのインストールと、Gitで特定のアクションが実行された際にカスタムスクリプトを叩くhuskyのセットアップが完了しました。
今回はコミット時にESLintとPrettierを実行したいため、pre-commitフックを使用します。
詳細については以下のドキュメントを参照してください。
The pre-commit hook is run first, before you even type in a commit message. It’s used to inspect the snapshot that’s about to be committed, to see if you’ve forgotten something, to make sure tests run, or to examine whatever you need to inspect in the code. Exiting non-zero from this hook aborts the commit, although you can bypass it with git commit --no-verify. You can do things like check for code style (run lint or something equivalent), check for trailing whitespace (the default hook does exactly this), or check for appropriate documentation on new methods.
続いてステージングエリアにあるファイルを対象にするようlint-stagedのセットアップをします。
.lintstagedrc.jsファイルを作成し、PrettierのドキュメントにPrettierよりも前にESLintを実行する必要がある、と注意書きがあるためESLintを実行してからPrettierが実行されるような設定を行います。
If you use ESLint, make sure lint-staged runs it before Prettier, not after.
# .lintstagedrc.js
import { relative } from 'path';

const buildEslintCommand = (filenames) =>
  `next lint --fix --file ${filenames
    .map((f) => relative(process.cwd(), f))
    .join(' --file ')}`;

const lintStagedConfig = {
  '*.{js,jsx,ts,tsx}': [buildEslintCommand, 'prettier --write'],
};

export default lintStagedConfig;
上記の設定が完了後、.tsファイルなどをコミットするとESLintとPrettierが自動的に実行されます。
GitHub Actionsによる静的テストの自動化
差分がある場合のみ実行する
最後にGitHub ActionsでPRをオープンした際などに静的テストを実行するようにします。
ワークフローの全体像としては、まずsrc/ディレクトリに差分があるか確認を行い、差分が存在する場合は静的テストを実行するようにします。
差分の検出にはtj-actions/changed-filesを使用することにしました。
差分確認を行うジョブの内容は以下の通りです。
# .github/workflows/ci.yml
name: ci

on:
  push:
    branches:
      - main
  pull_request:
    branches:
      - main
    types:
      - opened
      - synchronize
      - reopened
      - ready_for_review

concurrency:
  group: ${{ github.workflow }}-${{ github.ref }}
  cancel-in-progress: true

jobs:
  check-changes:
    name: Check changes
    if: github.event.pull_request.draft == false
    runs-on: ubuntu-24.04
    timeout-minutes: 5
    outputs:
      file_changed: ${{ steps.changed-files.outputs.any_changed }}
    steps:
      - uses: actions/checkout@v4

      - name: Get changed files
        id: changed-files
        uses: tj-actions/changed-files@v45
        with:
          base_sha: ${{ github.event.pull_request.base.sha }}
          files: src/**/*

      - name: List all changed files
        env:
          ALL_CHANGED_FILES: ${{ steps.changed-files.outputs.all_changed_files }}
        run: |
          for file in ${ALL_CHANGED_FILES}; do
            echo "$file was changed"
          done
src/ディレクトリの差分を確認して、List all changed filesのステップで差分が発生しているファイルをすべて出力しています。
またジョブ間で情報を渡せるようにjobs.check-changes.outputsを使っています。
そのため、後述の静的テストを行うジョブにてneeds.check-changes.outputs.file_changedを使用すればsrc/ディレクトリに差分が発生した場合のみ静的テストが走るようになります。
なお、上記のワークフローをそのまま採用すると、mainブランチへのpush時やmainブランチへのPRがドラフトではない時に実行されるようになります。
ワークフローのトリガーは好みに応じてカスタマイズしてください。
Node.jsとpnpmセットアップの複合アクションを作成する
今回の記事では範囲外ですが、結合テストなどを実行するジョブは今回の静的テストとは異なるジョブとします。
そのためこれらのジョブですでに共通していると判明しているNode.jsやpnpmのセットアップ部分を複合アクションを作成して重複を回避します。
.github/actionsディレクトリにsetup-node-pnpmというサブディレクトリを作成します。
そしてその中にaction.ymlを作成します。 以下はそのコードの内容です。
# .github/actions/setup-node-pnpm/action.yml
name: Setup Node.js and PNPM

description: Common setup for Node 20 and PNPM 10

runs:
  using: "composite"
  steps:
    - name: Install pnpm
      uses: pnpm/action-setup@v4
      with:
        version: 10

    - name: Use Node.js 20
      uses: actions/setup-node@v4
      with:
        node-version: 20
        cache: 'pnpm'

    - name: Cache dependencies
      uses: actions/cache@v4
      with:
        path: |
          node_modules
          .next/cache
        key: ${{ runner.os }}-nextjs-${{ hashFiles('**/pnpm-lock.yaml') }}-${{ hashFiles('**/*.js', '**/*.jsx', '**/*.ts', '**/*.tsx') }}
        restore-keys: |
          ${{ runner.os }}-nextjs-${{ hashFiles('**/pnpm-lock.yaml') }}-
pnpmのドキュメントを参考にNode.jsとpnpmのセットアップを行い、ジョブの依存関係をキャッシュするためにcacheアクションを使用しています。
あとはこの複合アクションを静的テストや結合テストのジョブで呼び出してあげるだけです。
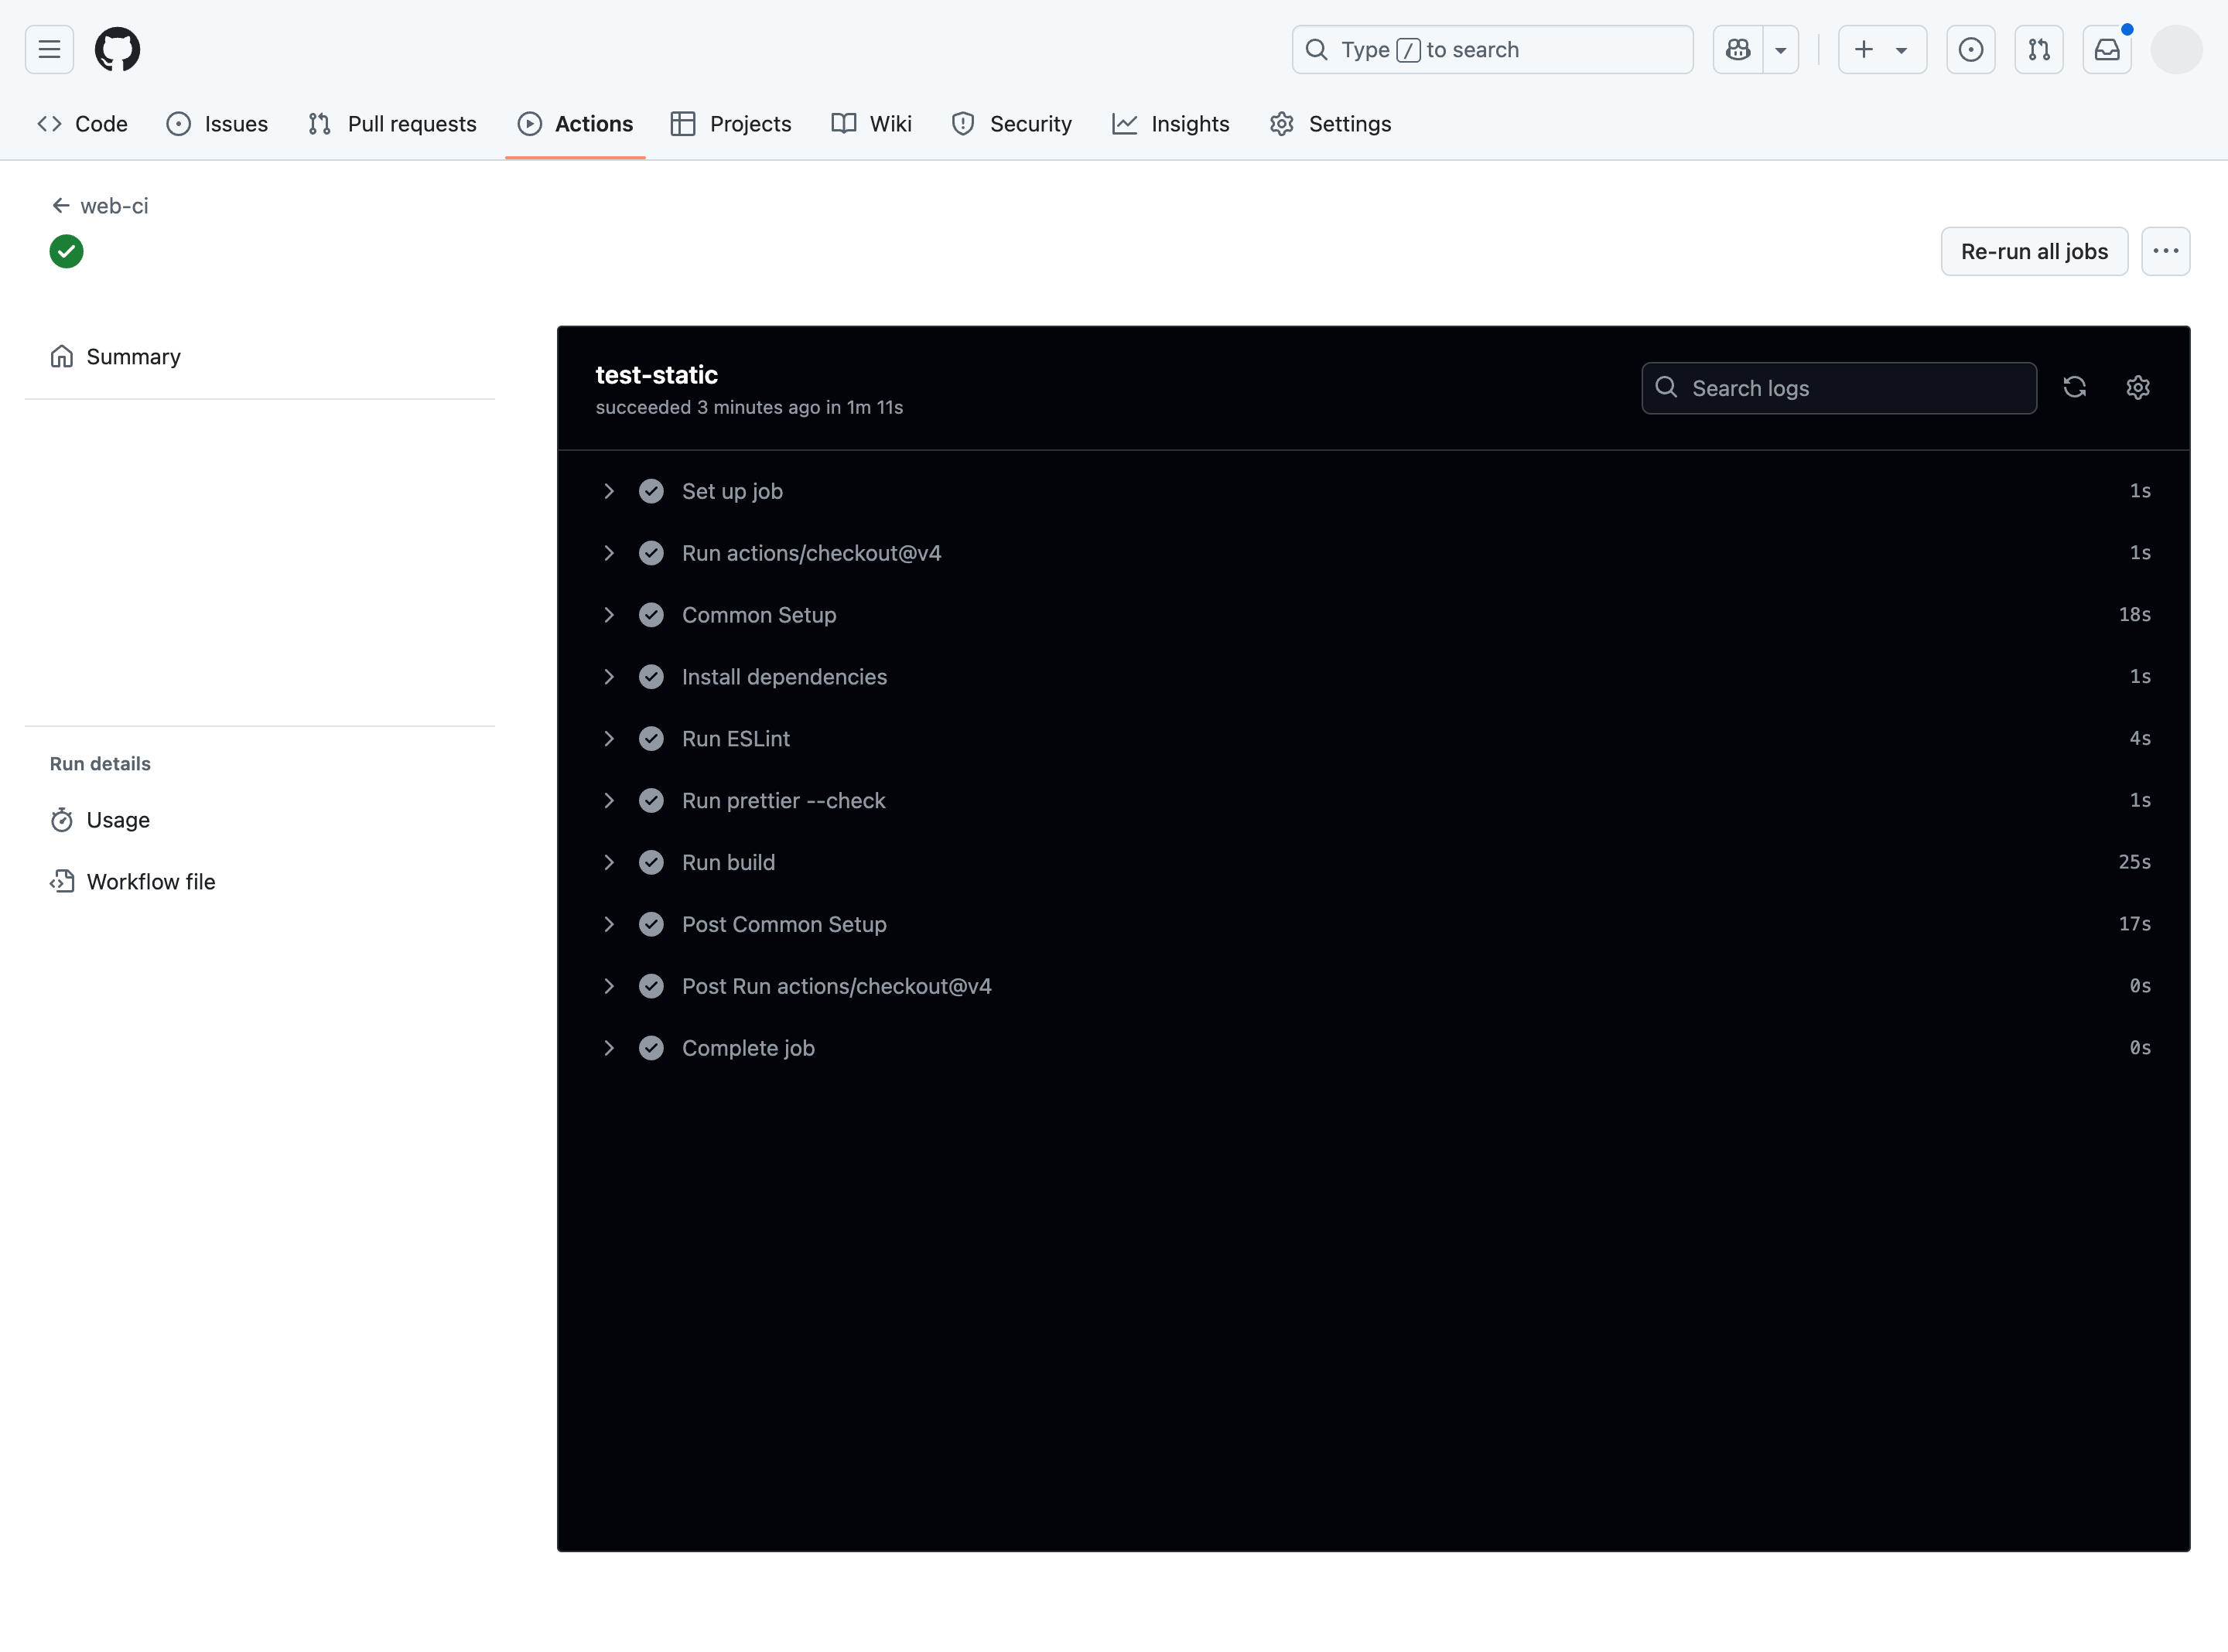
静的テストを実行する
最後に静的テストを実行するジョブを作成します。
静的テストとして実行するのは、これまでのセクションで環境を構築したESLintとPrettierに加えてビルドコマンドも実行します。
# .github/workflows/ci.yml
name: ci

on:
  push:
    branches:
      - main
  pull_request:
    branches:
      - main
    types:
      - opened
      - synchronize
      - reopened
      - ready_for_review

concurrency:
  group: ${{ github.workflow }}-${{ github.ref }}
  cancel-in-progress: true

jobs:
  check-changes:
    name: Check changes
    if: github.event.pull_request.draft == false
    runs-on: ubuntu-24.04
    timeout-minutes: 5
    outputs:
      file_changed: ${{ steps.changed-files.outputs.any_changed }}
    steps:
      - uses: actions/checkout@v4

      - name: Get changed files
        id: changed-files
        uses: tj-actions/changed-files@v45
        with:
          base_sha: ${{ github.event.pull_request.base.sha }}
          files: src/**/*

      - name: List all changed files
        env:
          ALL_CHANGED_FILES: ${{ steps.changed-files.outputs.all_changed_files }}
        run: |
          for file in ${ALL_CHANGED_FILES}; do
            echo "$file was changed"
          done

  test-static:
    name: Run Static Test
    needs: check-changes
    if: needs.check-changes.outputs.file_changed == 'true'
    runs-on: ubuntu-24.04
    timeout-minutes: 5
    steps:
      - uses: actions/checkout@v4

      - name: Common Setup
        uses: ./.github/actions/setup-node-pnpm

      - name: Install dependencies
        run: pnpm install

      - name: Run next lint
        run: pnpm lint

      - name: Run prettier --check
        run: pnpm exec prettier src/ --check

      - name: Run build
        run: pnpm build
この状態でsrc/ディレクトリに差分が発生するとmainブランチへのPRをオープンした際などに静的テストが実行されるようになります。
まとめ
今回の記事ではNext.jsの静的テスト環境構築とGitHub Actionsによる自動化を行いました。
次回はJestやMSWを使った単体・結合テスト環境の構築と自動化をやっていきたいと思います。


![Microsoft Power BI [実践] 入門 ―― BI初心者でもすぐできる! リアルタイム分析・可視化の手引きとリファレンス](/assets/img/banner-power-bi.c9bd875.png)
![Microsoft Power Apps ローコード開発[実践]入門――ノンプログラマーにやさしいアプリ開発の手引きとリファレンス](/assets/img/banner-powerplatform-2.213ebee.png)
![Microsoft PowerPlatformローコード開発[活用]入門 ――現場で使える業務アプリのレシピ集](/assets/img/banner-powerplatform-1.a01c0c2.png)