

Azure Communication Servicesを利用すると簡単に通話アプリを作成することができます。今日はそんなACSで作成された通話アプリでの通話内容をレコーディングする方法について解説していこうと思います。(機能自体は現在まだパブリックプレビュー状態です)
レコーディングは以下の図のような流れで実現することができます。
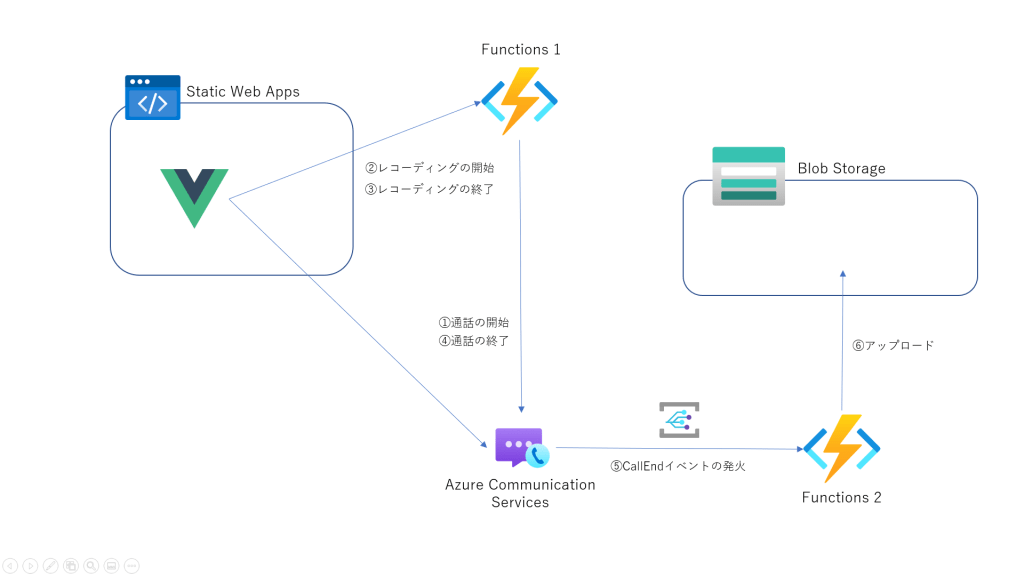
レコーディング機能を作成するには通話アプリとは別にレコーディング用のAzure Functionsを2つ作成する必要があります。1つ目はレコーディングのリクエストを飛ばすhttpトリガーのFunctionsで2つ目はレコーディングされたデータの取得が可能になった際のEvent Grid発火のBlob StorageにアップロードするFunctionsです。
ACSの使用方法等は説明すると長くなってしまうので今回は省きます。ACSを使用した通話アプリの作成方法に関しては「Vue+Azure Communication Servicesで通話アプリを作成する」という記事で詳しく説明しているので確認してみてください 。
事前準備
まずは通話アプリ側にも追加することがあるので追加していきます。レコーディングを行うにはserverCallIdというものが必要になります。
このidは以下のように取得することができます。
callAgent.on('callsUpdated', (e) => {
  e.added.forEach((addedCall) => {
    addedCall.on('stateChanged', () => {
      if (addedCall.state === 'Connected') {
        addedCall.info.getServerCallId().then(result => {
          console.log(result);
        }).catch(err => {
          console.log(err);
        });
      }
    });
  });
});
servierCallIdはレコーディングの開始と終了用のFunctionsにリクエストのクエリパラメータとして渡してあげる必要があります。
レコーディングの開始と終了用Functionsの作成
レコーディングのリクエストを飛ばす用のFunctionsを作成していきます。
まずはレコーディングの開始用の関数です。接続文字列はフロント側で使用しているものと同じACSのリソースのものを指定します。
レコーディングを開始するとrecordingIdが帰ってきますが、こちらはレコーディング終了時に必要となるのでフロント側にレスポンスとして返却してあげます。
[FunctionName("startRecording")]
public static async Task<IActionResult> startRecordingRun(
  [HttpTrigger(AuthorizationLevel.Function, "get", "post", Route = null)] HttpRequest req,
  ILogger log)
{
  Dictionary<string, string> recordingData = new Dictionary<string, string>();
  var config = new ConfigurationBuilder()
      .AddJsonFile("local.settings.json")
      .AddEnvironmentVariables()
      .Build();

  log.LogInformation("C# HTTP trigger function processed a request.");

  callingServerClient = new CallingServerClient(config["connectionString"]);

  string serverCallId = req.Query["serverCallId"];
  var uri = new Uri(config["baseUrl"]);

  var startRecordingResponse = await callingServerClient.InitializeServerCall(serverCallId).StartRecordingAsync(uri).ConfigureAwait(false);

  var recordingId = startRecordingResponse.Value.RecordingId;

  return new OkObjectResult(recordingId);
}
次にレコーディングの停止用の関数です。こちらの接続文字列も同様です。フロント側ではリクエストを投げる際、クエリパラメータとしてフロント側で取得したserverCallIdと先程レコーディング開始時返却されたrecordingIdを追加しておいてください。
[FunctionName("stopRecording")]
public static async Task<IActionResult> finishRecordingRun(
  [HttpTrigger(AuthorizationLevel.Function, "get", "post", Route = null)] HttpRequest req,
ILogger log)
{
  log.LogInformation("C# HTTP trigger function processed a request.");

 var config = new ConfigurationBuilder()
      .AddJsonFile("local.settings.json")
      .AddEnvironmentVariables()
      .Build();
  callingServerClient = new CallingServerClient(config["connectionString"]);

  string serverCallId = req.Query["serverCallId"];
  string recordingId = req.Query["recordingId"];

  var stopRecordingResponse = await callingServerClient.InitializeServerCall(serverCallId).StopRecordingAsync(recordingId).ConfigureAwait(false);

  return new OkObjectResult("ok");
}
Blob Storageにアップロード用Functionsの作成
次にEvent GridトリガーでBlob StorageにアップロードするFunctionsです。
こちらのFunctionsはイベントグリッドのイベントに通話が終了しレコーディングデータの準備ができたタイミングで発火するイベントがあるのでそちらを使用してレコーディングデータを受け取りBlob Storageにアップロードしていきます。
以下がアップロードするコードです。
[FunctionName("DownloadRecordingData")]
public static async System.Threading.Tasks.Task RunAsync([EventGridTrigger]EventGridEvent eventGridEvent, ILogger log)
{
  var config = new ConfigurationBuilder()
      .AddJsonFile("local.settings.json")
      .AddEnvironmentVariables()
      .Build();

  dynamic data = JsonConvert.DeserializeObject(eventGridEvent.Data.ToString());


  string contentLocation = data.recordingStorageInfo.recordingChunks[0].contentLocation;
  string documentId = data.recordingStorageInfo.recordingChunks[0].documentId;
  string fileFormat = "mp4";

  var recordingDownloadUri = new Uri(contentLocation);

  CallingServerClient callingServerClient = new CallingServerClient(config["ACSConnectionString"]);
  var response = callingServerClient.DownloadStreamingAsync(recordingDownloadUri);

  // blobへの書き込み
  BlobServiceClient blobServiceClient = new BlobServiceClient(config["BlobStorageConnenctionString"]);

  //Create a unique name for the container
  string containerName = eventGridEvent.Id;

  log.LogInformation("Create blob container client");
  // Create the container and return a container client object
  BlobContainerClient containerClient = await blobServiceClient.CreateBlobContainerAsync(containerName);

  BlobClient blobClient = containerClient.GetBlobClient(documentId + "." + fileFormat);

  await blobClient.UploadAsync(response.Result.Value, true);
}
こちらでFunctions自体は完成ですが、実際にレコーディングを動かすにはACSのリソース側でイベントグリッドの設定をしてあげる必要があります。
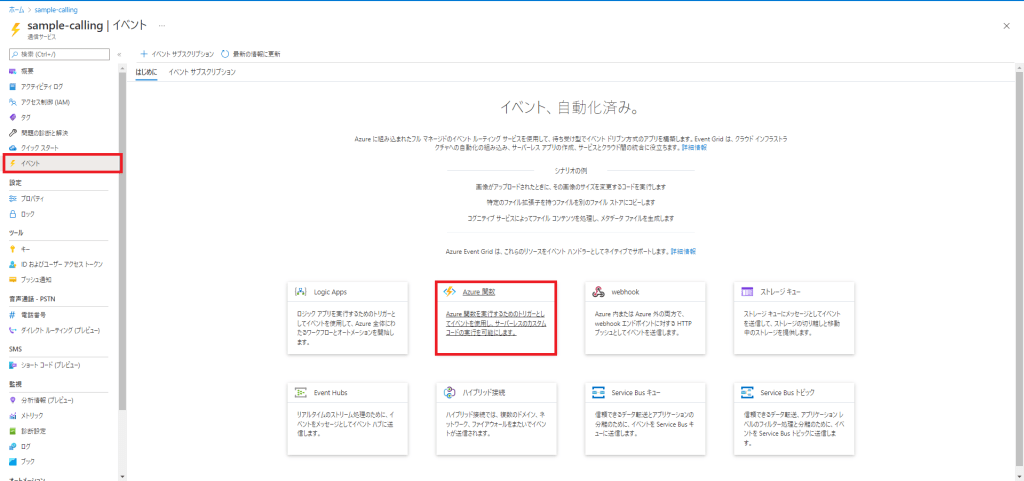
ACSのリソースを開いて、「イベント」→「Azure関数」をクリック
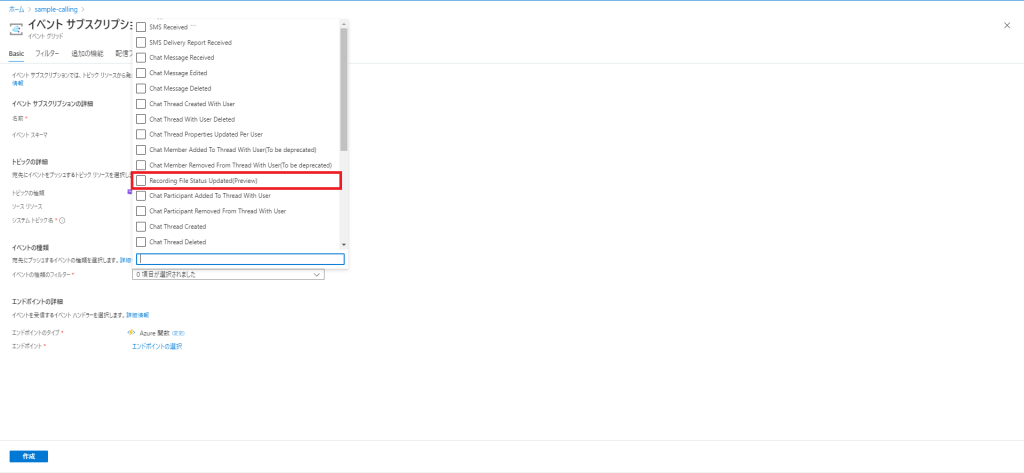
「イベントの種類」で「Recording File Status Updated」をチェック。「エンドポイントの詳細」のエンドポイントには先程作成したイベントグリッド用のFunctionsのエンドポイントを追加してください。
設定は以上です。これでレコーディングが保存されるようになりました!


![Microsoft Power BI [実践] 入門 ―― BI初心者でもすぐできる! リアルタイム分析・可視化の手引きとリファレンス](/assets/img/banner-power-bi.c9bd875.png)
![Microsoft Power Apps ローコード開発[実践]入門――ノンプログラマーにやさしいアプリ開発の手引きとリファレンス](/assets/img/banner-powerplatform-2.213ebee.png)
![Microsoft PowerPlatformローコード開発[活用]入門 ――現場で使える業務アプリのレシピ集](/assets/img/banner-powerplatform-1.a01c0c2.png)